Gamecube/N64 controller to USB adapter (Third generation)
Introduction
Complete adapter
Why a new version you ask? Because it was possible to do even better. Just compare:
| Old version (v1, v2) | New version (v3) |
|---|---|
|
|
A complete redesign of the electronics is what enables all those improvements. The use of a micro-controller with native USB support simply removes the restrictions imposed by the software-only USB implementation that was formally used, to the benefit of higher performance and opening up of new possibilities.
[1]Ok, ok, when I say impossible, I mean for the average user who bought a ready made adapter from me. Of course, it will always be possible to upgrade an adapter by cutting open the heat shrink and soldering the AVR programmer wires to the right places...
Specifications
The adapter:
- N64 and Gamecube controllers supported. (list)
- Gamecube vibration and N64 Rumble supported.
- 100% functional without installing special drivers.. Easy to use. (Connects as an USB HID joystick with PID force feedback)
- Works under Linux, Mac OS X and Windows.
- Configurable controller poll frequency (Maximum 500Hz)
- Very low USB latency (Polled at 1000Hz)
- Updateable firmware.
- Some aspects of the adapter are configurable.
- Has support for direct controller communication.
- Each adapter has its own serial number.
Drivers:
- None! Uses standard drivers included with supported operating systems.
- Easy to use user interface able to manage several adapters.
- Adapter firmware version display and firmware update function.
- Connected controller type display.
- Built-in vibration/rumble test.
- N64 mempak support: read/write and edit tools.
- Supports .N64 and .MPK mempak image files.
- N64 Transfer Pak support: Read/Write Gameboy save games
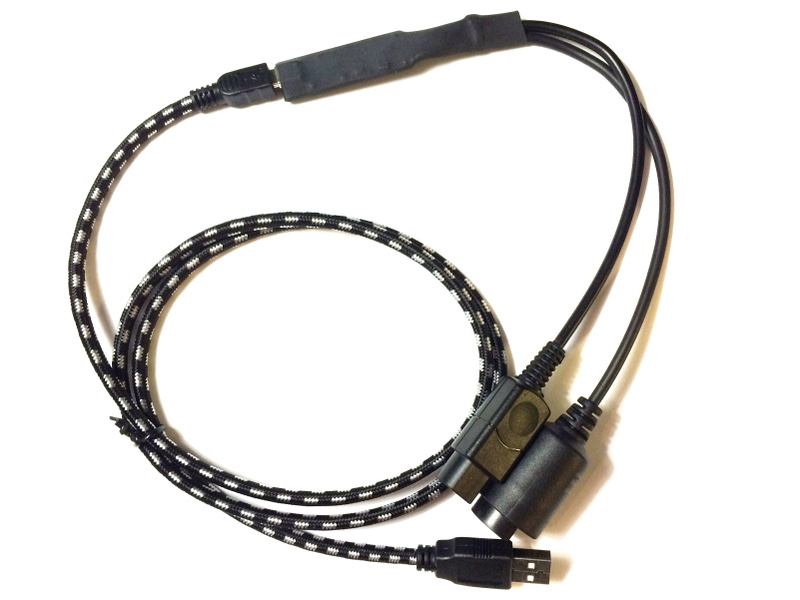
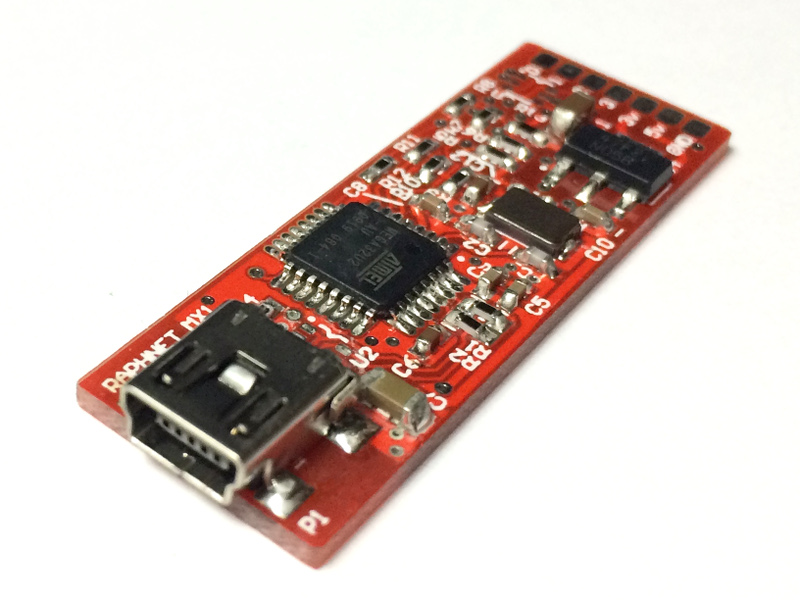
Pictures
Here is a complete adapter: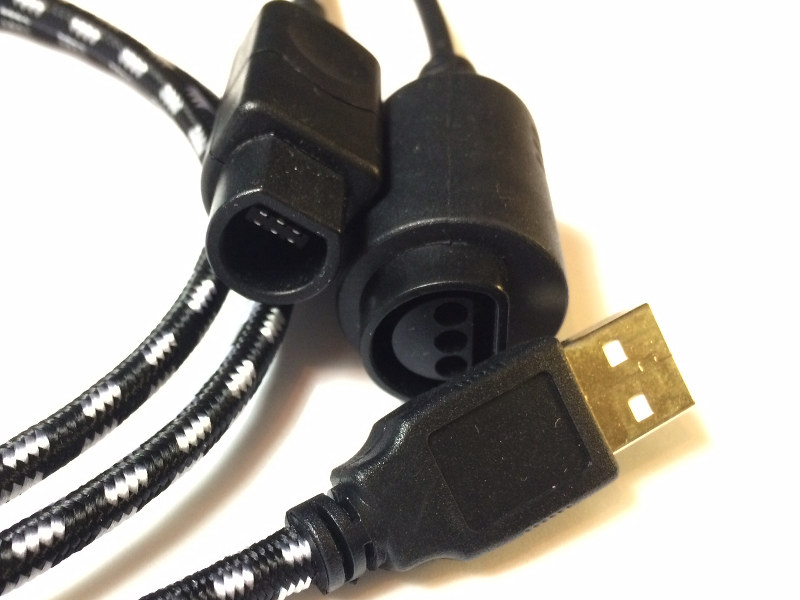
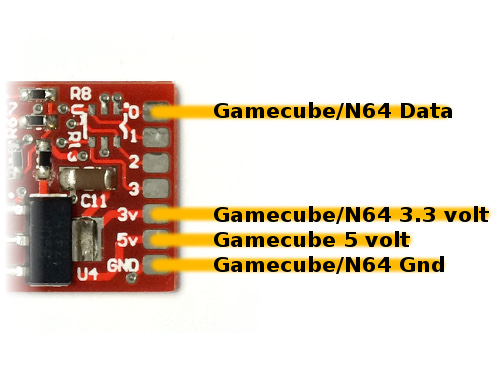
Gamecube/N64 connectors
Overview
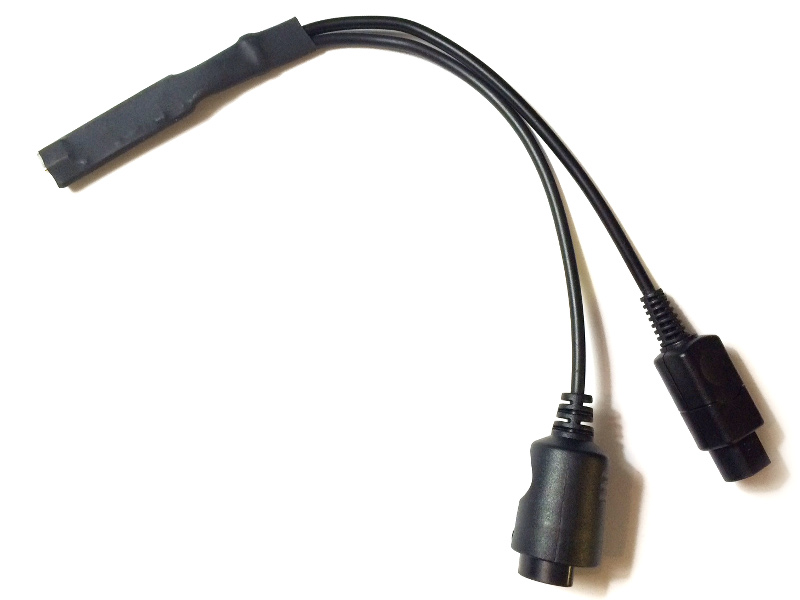
The USB cable is detachable
The firmware is designed to run on my Multiuse PCBX circuit. That's in fact what was used to build the adapter above. All required components (3.3v regulator, resistors, 16 MHz crystal..) are present on the board. All that needs to be done is to solder the controller connector wires.
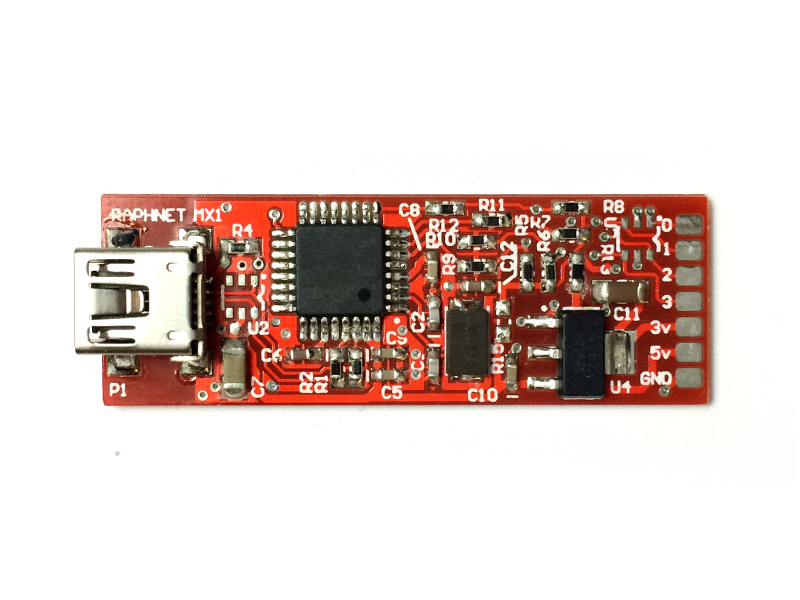
Multiuse PCB-X

Multiuse PCB-X
Multiuse PCB-X
Wiring
For development and debugging, I use an at90usb1287 version of the firmware which runs on an old STK525 development kit with a few modifications: The crystal must be changed to 16MHz. Controllers are wired to EXPAND 0 pins. Pins 39,40: GND, pin 38: Data [PORTD0]. Jumpers are configured to supply 5v to the micro-controller. The controller required 3.3v is obtained from the on-board regulator. 5v output to the Gamecube controller is directly from the USB bus (VBUS).
The third picture shows another development setup, but this time it is Multiuse PCB-X based. The switch and the extra green wire are there for debugging purposes. They don't normally have a purpose.
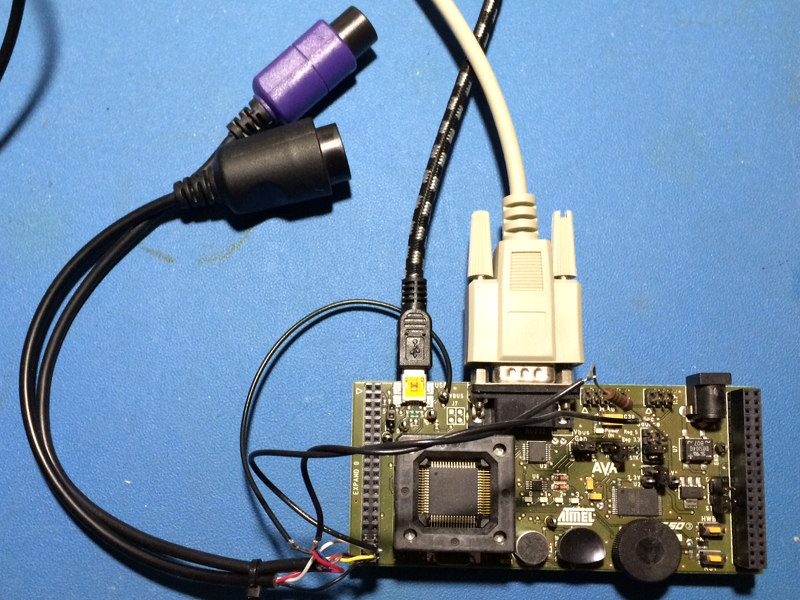
Development on STK525

Development on STK525
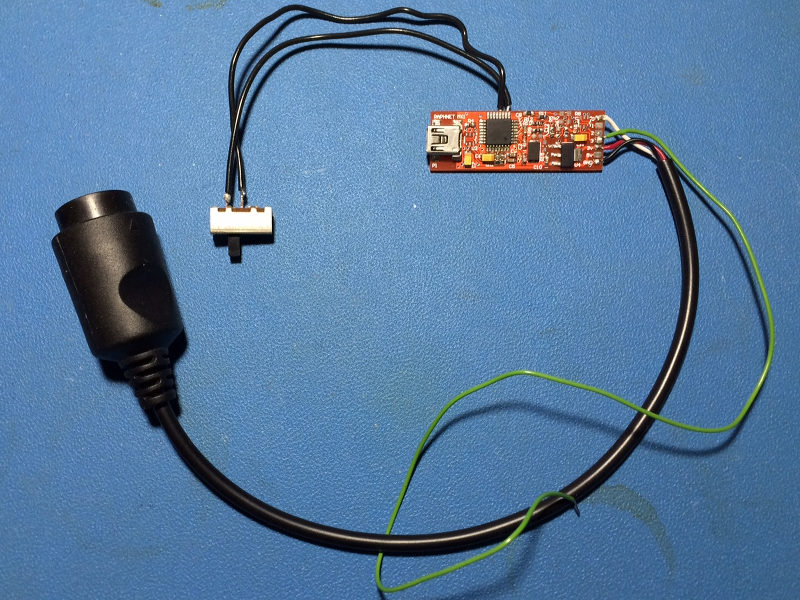
Development on Multiuse PCB-X
Schematic
This project uses my Multiuse PCB-X design. Here are wiring and pinout references for N64 and Gamecube controllers.
Wiring for Multiuse PCB-X
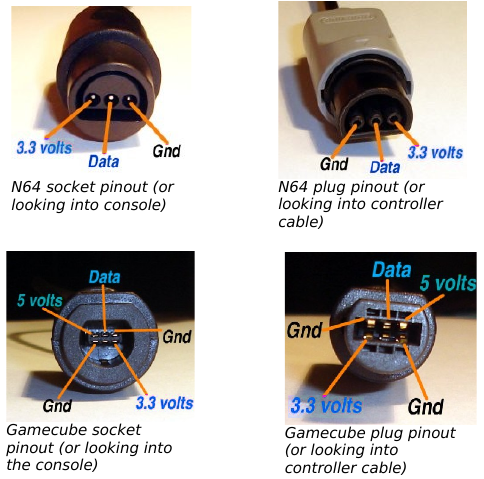
N64/Gamecube pinouts
For two player modes: Wire the additional controller power lines (3.3volt, 5 volt, GND) the same as for the first controller, but connect the 'Data' line to the pad labelled 1 instead of 0. (i.e. Each controller uses a decicated data input). Don't forget to also configure the adapter for two-player mode. (see Personalities and multiplayer modes for more information)
For the Multiuse PCB-X schematic: Please visit the Multiuse PCB-X page.
Firmware and source code
If you are updating your adapter, the following firmwares (.hex files) can be programmed using the management tool or using the command-line.If your circuit is new (i.e. it has never been programmed), dfu-programmer must be used directly.
# Programming a new PCB
$ dfu-programmer atmega32u2 erase
$ dfu-programmer atmega32u2 flash firmware.hex
$ dfu-programmer atmega32u2 start
Firmware files (.hex) and source-code packages is available below. The command-line tools and management tool source code is also included and
licensed under GPLv3.
IMPORTANT: Always use the latest version of the adapter management tool
to perform updates.
| Version 3.6.1 March 5, 2021 (Friday) |
|---|
|
| File(s): gcn64usb-3.6.1.hex (44.3 KB) gcn64usb-3.6.1.tar.gz (55.9 KB) |
Show previous releases...
| Version 3.6.0 October 6, 2018 (Saturday) |
|---|
|
| File(s): gcn64usb-3.6.0.hex (43.3 KB) gcn64usb-3.6.0.tar.gz (54.6 KB) |
| Version 3.5.1 April 10, 2018 (Tuesday) |
|---|
|
| File(s): gcn64usb-3.5.1.hex (38.9 KB) gcn64usb-3.5.1.tar.gz (51.2 KB) |
| Version 3.5.0 November 25, 2017 (Saturday) |
|---|
New features and bugfixes:
|
| File(s): gcn64usb-3.5.0.hex (41.4 KB) gcn64usb-3.5.0.tar.gz (50.6 KB) |
| Version 3.4.0 January 8, 2017 (Sunday) |
|---|
Performance improvement:
|
| File(s): gcn64usb-3.4.0.hex (39.9 KB) gcn64usb-3.4.0.tar.gz (49.5 KB) |
| Version 3.3.2 November 27, 2016 (Sunday) |
|---|
Minor bugfix:
|
| File(s): gcn64usb-3.3.2.hex (39.2 KB) gcn64usb-3.3.2.tar.gz (48.2 KB) |
| Version 3.3.1 November 2, 2016 (Wednesday) |
|---|
Add dual controller support:
|
| File(s): gcn64usb-3.3.1.hex (39.1 KB) gcn64usb-3.3.1.tar.gz (48.6 KB) |
| Version 3.3.0 |
|---|
| Version 3.3.x series: Dual controller support. Do not install older versions on dual-controller adapters. |
| File(s): |
| Version 3.2.1 September 22, 2016 (Thursday) |
|---|
| Implement N64-only and GC-only personalities (Different USB product ID and device name). |
| File(s): gcn64usb-3.2.1.hex (33.8 KB) gcn64usb-3.2.1.tar.gz (46.7 KB) |
| Version 3.2.0 May 28, 2016 (Saturday) |
|---|
|
| File(s): gcn64usb-3.2.0.hex (33.4 KB) gcn64usb-3.2.0.tar.gz (46.5 KB) |
| Version 3.1.1 February 29, 2016 (Monday) |
|---|
| Bugfix: Fix vibration code for x360ce (Vibration would turn on and never stop) |
| File(s): gcn64usb-3.1.1.hex (33.4 KB) gcn64usb-3.1.1.tar.gz (46.3 KB) |
| Version 3.1.0 February 24, 2016 (Wednesday) |
|---|
Features and bugfixes:
|
| File(s): gcn64usb-3.1.0.hex (33.4 KB) gcn64usb-3.1.0.tar.gz (46.3 KB) |
| Version 3.0.0 October 5, 2015 (Monday) |
|---|
| First version |
| File(s): gcn64usb-3.0.0.hex (32.9 KB) |
 This project is also available on GitHub!
To request features, report issues or contribute, you may send me an email or use the GitHub repository:
https://github.com/raphnet/gc_n64_usb-v3
Management tool
The management tool (not required to use the adapter) can perform a vibration/rumble test, can update an adapter's firmware and perform read/write operations on N64 mempaks. The built-in mempak editor supports common .N64 and .MPK mempak image file formats. Downloading cheats from gamefaqs and using them on the real N64 system is therefore possible! The editor also supports importing and exporting individual saves (notes) in separate files.
Main screen
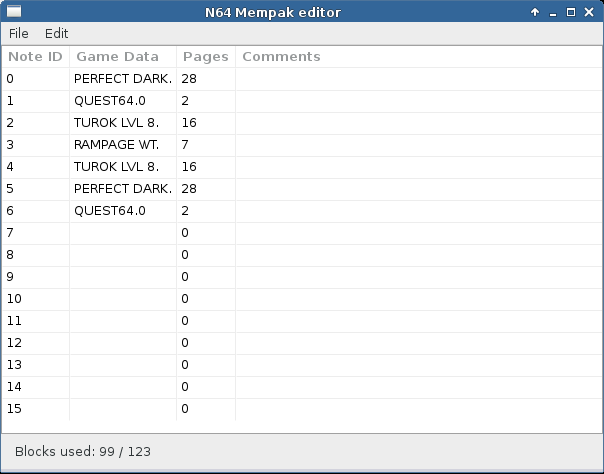
Mempak editor
The adapter update function asks you to select the firmware .hex file and does a few checks to prevent mistakes (ex: Installing an incompatible firmware). Once the file is selected, clicking "Start update" is all there is to do. If everything goes well (please, do not disconnect anything!) after a few moments the Update successful window should confirm the update.

Before
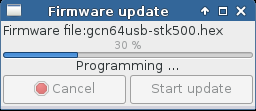
During
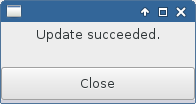
After
Download: Available from the Tools for the 3rd generation of raphnet GC/N64 to USB adapters page.
Command line tools
I made a few command-line tools to manipulate the adapter:- gcn64ctl: Configuration, memory card I/O and more
- mempak_ls, mempak_rm, mempak_format, mempak_insert_note: N64 mempak image file manipulation.
Supported controllers
Here is a list of tested controllers/adapters:| Type | Make/Manufacturer | Model | Status | Tested by |
|---|---|---|---|---|
| Gamecube | Nintendo | Standard (DOL-003) | OK | raphnet.net |
| Gamecube | Nintendo | Super Smash Bros edition (DOL-003) | OK | raphnet.net |
| Gamecube | Nintendo | Standard (Japan import, extra long cable) | OK | raphnet.net |
| Gamecube | Nintendo | Wavebird | OK | raphnet.net |
| Gamecube | Ascii | Gamecube keyboard (joystick part) | OK | raphnet.net |
| Gamecube | Ascii | Gamecube keyboard (keyboard part) | OK since firmware v3.6.0 | raphnet.net |
| Gamecube | Intec | Wireless | OK | raphnet.net |
| Gamecube | Mad Catz | Microcon (item no. 5636) | OK | raphnet.net |
| Gamecube | ? | Playstation to Gamecube adapter | OK | raphnet.net |
| Gamecube | Hori | Hori digital pad for GameCube | OK | User |
| Gamecube | Nyko | PS2 to Gamecube adapter | Does not work | User |
| N64 | Nintendo | Standard | OK | raphnet.net |
| N64 | Hori | Minipad mini 64 | OK | raphnet.net |
| N64 | TTX | ? | OK | raphnet.net |
| N64 | Ascii | Ascii pad 64 | OK | User |
| N64 | Retro Fighters | Brawler 64 | OK | Utilisateur |
Latency explained
For responsive controls and high performance gaming, high adapter latency is extremely undesirable. Let's look at why and how it happens and what can be done to minimize it.If expressed with words, an adapter works like this:
- At a fixed interval, the adapter polls the controller to detect state changes (buttons, axis, etc).
- When a change is detected, the adapter sends an event to the PC.
- But USB devices are also polled by the PC at a fixed interval. This means that to send the event, the adapter actually has to wait until the next USB poll.
- The controller poll interval: Adapters commonly poll controllers at 16ms intervals. This makes sense as it mimics what most games do in polling the controller once per video frame. But it also means that if you push fire 1ms after the poll, the adapter will only know it at the next poll, 15ms later.
- The USB poll interval: For an USB low speed device, the minimum interval is 10ms. Depending on the timing, if the adapter learns about the button press right after the USB poll took place, the computer won't know about it for another 10ms. In the worst case scenario, the 15ms latency from point 1 adds to the 10ms, totalling 25ms.
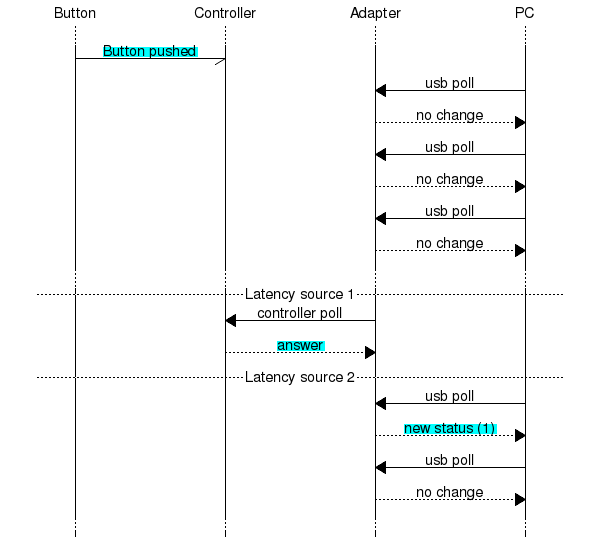
The chart clearly shows:
- Latency source 1: The button press occurs, but the adapter knows about it later when it polls the controller.
- Latency source 2: The adapter finally knows about the button press but has to wait for the next USB poll to report it to the PC.
Minimizing latency
Given the above an obvious solution comes to mind: USB and controller polls both should take place as often as possible. Let's examine both:- USB polls: This is a simple matter of setting the USB endpoint descriptor bInterval field to a low value. For USB Low speed devices, the minimum interval is 10ms. For USB Full speed devices, the minimum is 1ms. This adapter, being a full speed device, uses the minimum value of 1ms.
- Controller polls: By default, this adapter polls at 5ms intervals. But this can be changed using the management tool. Setting this to a very low value does not appear to cause problems with standard controllers, but incompatibilities could arise when using third party controllers or adapters.
| Adapter | USB type | Controller poll interval | USB poll interval | Worst case | Comments |
|---|---|---|---|---|---|
| raphnet gcn64usb v3 (The one on this very page) | Full speed | 5ms default | 1ms | 6ms | If controller poll is configured to the minimum value of 2ms, worst case is only 3ms. |
| raphnet gc/n64 usb v2 (predecessor) | Low speed | 4ms | 5ms[1] | 14ms | Due to the report size, two USB polls are necessary to transmit an event, hence the 14ms worst case instead of 9ms |
| Non-raphnet adapters (for reference) | |||||
| Mayflash dual N64 to USB | Low speed | 16ms | 8ms | 24ms[2] | bInterval = 8ms, controller poll interval verified using an oscilloscope. |
| Mayflash GC (4x) to USB (PC mode) | Full sped | 8ms | 1ms | 9ms[2] | bInterval = 1ms, controller poll interval verified using an oscilloscope. |
[2] The worst case value given for non-raphnet adapters assumes that no attempt is made to synchronize controller reads with USB polls (i.e. reading the controller right before the USB poll). If they are doing synchronisation, then the usb poll interval (or a fraction of it depending on design margins) needs to be subtracted from the worst case value.
Personalities and multiplayer modes
Since firmware version 3.2.1, there are several modes (or personalities) allowing a more accurate adapter USB product name to be displayed. For instance, if you built a N64 to USB adapter, the adapter can now appear as "N64 to USB" instead of "GC/N64 to USB".Also, since firmware version 3.3.1, there are also two player modes.
Configuring the personality and/or enabling a two payer mode must be done using the gcn64ctl command-line tool.
Instructions:
- Install the adapter management tool. It has a graphical user interface, but command-line tools will be installed along with it. There will be an entry in the start menu (or the new equivalent and concept of the day) to open a terminal in the folder where the tool executables are.
- Connect the adapter to configure. Only one adapter should be connected at the time.
- Execute the command with the appropriate mode argument.
- Use the --reset command, or disconnect and reconnect the adapter to start using the new mode.
# Syntax for configuring an adaptater
gcn64ctl -f --set_mode xx

# To restart the adapter
gcn64ctl -f --reset
(where xx must be replaced by the appropriate numerical code)
| Code | Name | Number of players |
|---|---|---|
| 0 | GC/N64 to USB v?? | 1 |
| 1 | N64 to USB v?? | 1 |
| 2 | Gamecube to USB v?? | 1 |
| 16 | Dual GC/N64 to USB v?? | 2 |
| 17 | Dual N64 to USB v?? | 2 |
| 18 | Dual Gamecube to USB v?? | 2 |
Keyboard support
Since firmware version 3.6.0, the adapter supports Gamecube keyboards.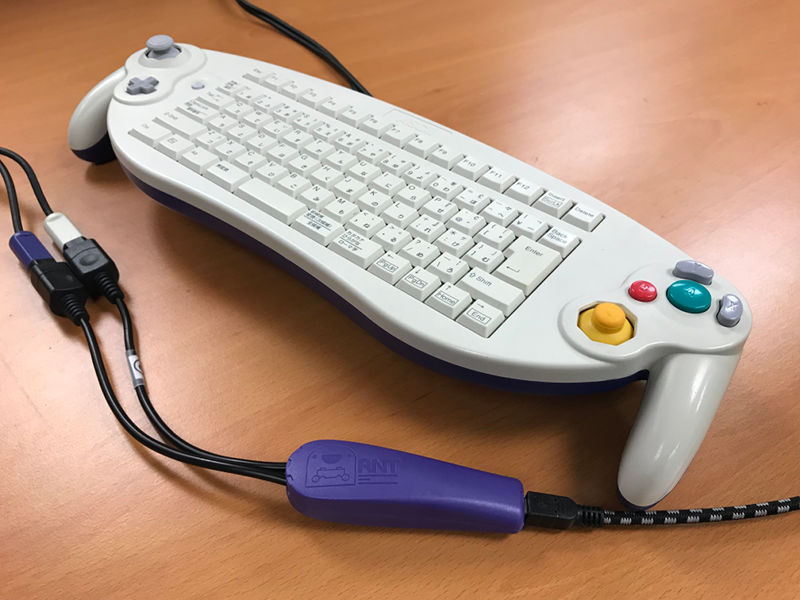
raphnet ADAP-2XGC-USB-V and ASCII ASC-1901PO
Configuration
For the adapter to recognize the adapter and act as an USB keyboard on the PC side, keyboard mode must first be enabled with the adapter manager.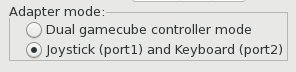
The current mode is saved in the adapter and automatically recalled each time you connect the adapter.
Single-player adapters
As there is only one port on single-player adapters, those only support the keyboard part or the joystick part, but not both at the same time, unless you use two adapters.When the adapter is in keyboard mode, the keyboard cable (white) must be connected. Connecting the joystick cable (purple) or a regular Gamecube controller has no effect when the adapter is in keyboard mode.
Two-player adapters
Connect the joystick cable (purle) to port 1 and the keyboard cable (white) to port 2. The adapter will present itself as a Keyboard and a Joystick on the PC side.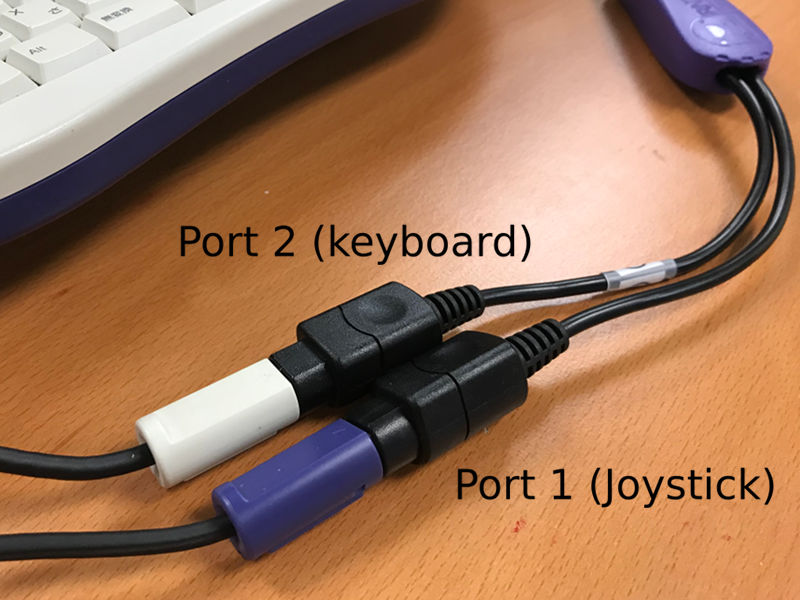
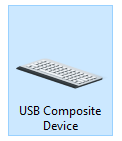
Under Windows 10, the two-player adapter in keyboard mode appears as a composite device in Devices and Printers.
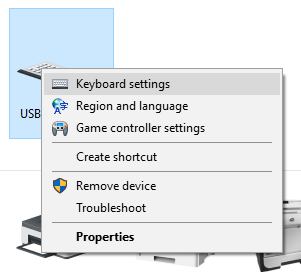
Accessing the contextual menu by right-clicking on this icon shows both keyboard and game controllers settings:
Disclaimer
I cannot be held responsible for any damages that could occur to you or your equipment while following the procedures present on this page. Also, I GIVE ABSOLUTELY NO WARRANTY on the correctness and usability of the informations on this page. Please note, however, that the procedures above have worked in my case without any damages or problems.Now you cannot say that I did not warn you :)