Management tools for raphnet USB adapters
About this project
 The third generation of my Gamecube/N64 to USB adapters has upgradable firmware and
offers advanced functionalities such as a configurable polling frequency and N64 mempak access.
The third generation of my Gamecube/N64 to USB adapters has upgradable firmware and
offers advanced functionalities such as a configurable polling frequency and N64 mempak access.Since this is outside the scope of what a typical USB game controller does, operating systems do not support those new functions. Development of additional utilities was therefore necessary.
Those tools (both graphical and command-line based) are explained and distributed on this page.
Features:
- Adapter version display
- Adapter firmware update
- Displays the type of controller connected
- Vibration test (N64 Rumble Pak and Gamecube vibration)
- Read/Write N64 Controller Pak ("memory paks"), memory pak editor
- N64 Transfer Pak support:
- Read ROM from ROM-Only, MBC1, MBC2, MBC3, MBC5 and POCKET CAMERA gameboy cartridges.
- Read/Write save RAM for MBC1, MBC2, MBC3, MBC5 and POCKET CAMERA gameboy cartridges.
- Gamecube to N64 adapter management (firmware update, version display)
Downloads
| Version 2.1.31 April 4, 2025 (Friday) |
|---|
Add Classic controller to USB adapter firmware version 2.2.8:
|
| File(s): raphnet-tech_adapter_manager-install-2.1.31.exe (17.6 MB) raphnet-tech_adapter_manager-2.1.31.tar.gz (2.7 MB) |
Show previous releases...
| Version 2.1.30 May 22, 2024 (Wednesday) |
|---|
Improved the user interface for two player adapters and added a new firmware. Details:
|
| File(s): raphnet-tech_adapter_manager-install-2.1.30.exe (17.5 MB) raphnet-tech_adapter_manager-2.1.30.tar.gz (2.7 MB) |
| Version 2.1.29 April 25, 2024 (Thursday) |
|---|
|
| File(s): raphnet-tech_adapter_manager-install-2.1.29.exe (17.5 MB) raphnet-tech_adapter_manager-2.1.29.tar.gz (2.6 MB) |
 This project is also available on GitHub!
To request features, report issues or contribute, you may send me an email or use the GitHub repository:
https://github.com/raphnet/gcn64tools
Graphical user interface
The management tool can perform a vibration/rumble test, can update an adapter's firmware and perform read/write operations on N64 mempaks. The built-in mempak editor supports common .N64 and .MPK mempak image file formats. Downloading cheats from gamefaqs and using them on the real N64 system is therefore possible! The editor also supports importing and exporting individual saves (notes) in separate files.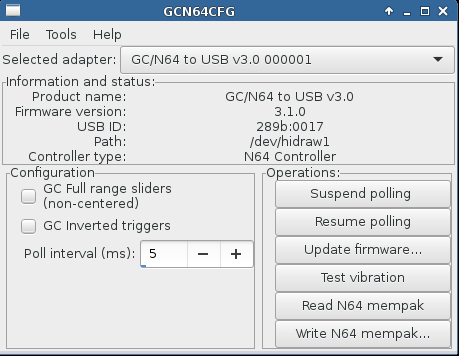
Main screen
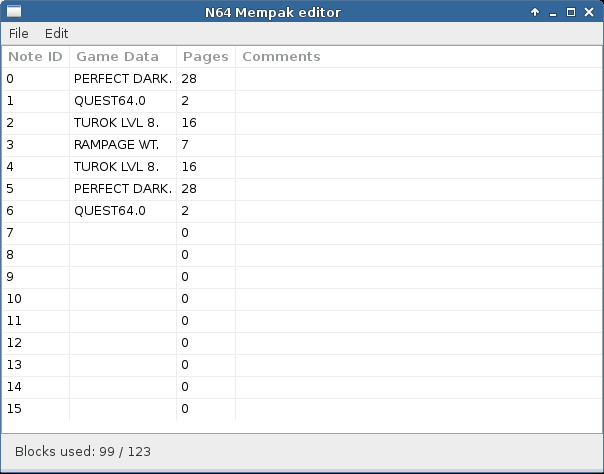
Mempak editor
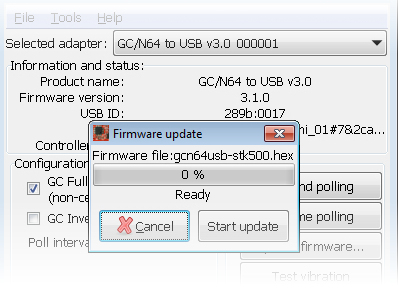
The adapter update function asks you to select the firmware .hex file and does a few checks to prevent mistakes (ex: Installing an incompatible firmware). Once the file is selected, clicking "Start update" is all there is to do. If everything goes well (please, do not disconnect anything!) after a few moments the Update successful window should confirm the update.
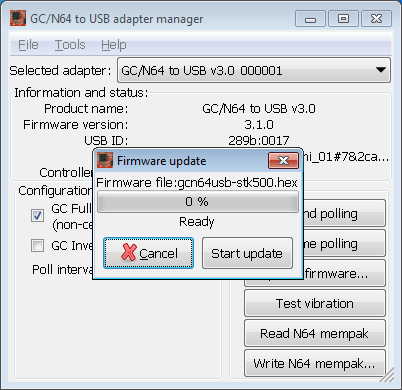
Before
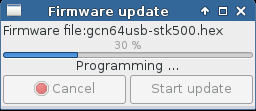
During
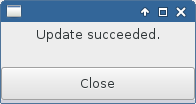
After
IMPORTANT: Always use the latest version of the adapter management tool to update adapters.
Command-line tools
The command-line tools are very useful if you appreciate simplicity and efficiency. They are available in the tools/ subdirectory of the source code, and will also be available in compiled form (.exe) when I start releasing builds for Windows.gcn64ctl
Here are a few examples of use for gcn64ctl. Use the --help option for more information.# Listing adapters
$ ./gcn64ctl -l
Simply listing the devices...
Found device 'GC/N64 to USB v3.0', serial '000001'
1 device(s) found
# Displaying the adapter version
$ ./gcn64ctl -s 000001 --get_version
Firmware version: 3.1.0
# Displaying the configured polling interval
$ ./gcn64ctl -s 000001 --get_poll_rate
Poll interval: 5 ms

# And to configure it:
$ ./gcn64ctl -s 000001 --set_poll_rate 10
Setting poll interval to 10 ms
# Reading a N64 mempak
$ ./gcn64ctl -s 000001 --n64_mempak_dump --outfile backup.n64
Output file: backup.n64
Reading mempak...
Reading address 0x7fe0 / 0x8000
Wrote file 'backup.n64' in N64 format
Tools for handling mempak images
These tools make it possible to convert mempak image files (.MPK to/from .N64), display and manipulate the content (add/remove/export/import notes), etc. Note that these tools operate on files and never access a physical mempak. To read/write a real mempak, use gcn64ctl or the graphical tool.Note: Everything shown below is also possible using the mempak editor built in the graphical adapter management tool.
# Displaying the content
$ ./mempak_ls test2.n64
File size: 36928 bytes
.N64 file detected
Mempak image loaded. Image type 3 (N64)
Mempak content is valid
Block usage: 97 / 123
Note 0: PERFECT DARK. (28 blocks)
Note 1: QUEST64.0 (2 blocks)
Note 2: TUROK LVL 8. (16 blocks)
Note 3: RAMPAGE WT. (7 blocks)
Note 4: TUROK LVL 8. (16 blocks)
Note 5: PERFECT DARK. (28 blocks)
Note 6: Free
...
Note 15: Free
# Erasing a note (Note ID as listed by mempak_ls)
./mempak_rm test2.n64 5
File size: 36928 bytes
.N64 file detected
Loaded pakfile in N64 format.
Deleting note 5 (28 blocks)
# Converting a file
./mempak_convert test2.n64 test2a.mpk -f mpk
File size: 36928 bytes
.N64 file detected
Loaded file 'test2.n64' (N64 format)
Wrote file 'test2a.mpk' in MPK format
# Creating a new image (formatting)
$ ./mempak_format new.n64
Wrote empty (formatted) memory card file 'new.n64' in 'N64' format
# Extracting a note
$ ./mempak_extract_note test2.n64 3 rampage.note
File size: 36928 bytes
.N64 file detected
Exported note 3 to file 'rampage.note'
# Importing a note
$ ./mempak_insert_note new.n64 rampage.note
File size: 36928 bytes
.N64 file detected
Loaded pakfile in N64 format.
Current free blocks: 123
Note size: 7 blocks
Note name: RAMPAGE WT.
Note imported and written to slot 0
Updating an adapter under Windows
Windows users, please read this:- When you will attempt to update an adapter for the very first time, Windows will detect a new device and will want to install a driver. This is an expected behaviour. However, installation will take so much time that the update will timeout and fail. Do not panic, disconnect the adapter, reconnect it, restart you computer and try again.
- With the current version of the tool, there is unfortunately a black window that keeps flashing during the update. Do not worry, this is a known issue. I will try to correct it in the future, but meanwhile at least updates work.
- If update fails and your adapter becomes unusable, please follow these steps to recover your adapter.
Ready

Black window
Linux notes
If the tool does not detect your adapter despite it being properly connected, the most likely cause is that your user does not have the required permissions to access it.Running the tool as root would work, but it is a very bad practise. Not recommended. Configuring udev to give your user the appropriate permissions is much cleaner. On my system, my user is a member of the plugdev group, and I use the following files to give the plugdev group direct access to the adapter in normal mode (99-raphnet.rules) and in update mode (99-atmel-dfu.rules).
/etc/udev/rules.d/99-raphnet.rules
SUBSYSTEM=="hidraw", ATTRS{idVendor}=="289b", ATTRS{idProduct}=="0017", MODE="0664", GROUP="plugdev"
SUBSYSTEM=="hidraw", ATTRS{idVendor}=="289b", ATTRS{idProduct}=="001d", MODE="0664", GROUP="plugdev"ATTR{idVendor}=="03eb", ATTR{idProduct}=="2ff0", MODE="0664", GROUP="plugdev" # ATmega32U2 DFU
ATTR{idVendor}=="03eb", ATTR{idProduct}=="2ffb", MODE="0664", GROUP="plugdev" # AT90USB128 DFU
Failed update recovery
I know the update function offered by the graphical user interface has a lot of room for improvement, especially under Windows where for many users, updating fails, leaving the adapter in an unusable state.There are two variations of the issue:
- The adapter comes back to life once disconnected and reconnected. If it does not show the new adapter version in the management tool, the update may be re-attempted and then usually works.
- The adapter does not come back to life, even if disconnected a few times. When connected, it appears as a device named "ATmega32U2 DFU" and is not detected as a joystick. The adapter management tool does not "see" it either.
Step 1: Disconnect the adapter
Disconnect the adapter and only reconnect it when told so at step 3 below.Step 2: (re)Install the adapter management tool
Make sure you have the very latest version of the adapter management tool installed. Even if you do, re-install it, and make sure to check the "Install driver for updating adapter firmware" option during installation. This installs the driver to handle the adapter when it is in update mode.Windows Security will warn that a device driver by Atmel Norway is about to be installed. Make sure to click Install (beware: The button saying Don't Install has focus by default). Atmel is the manufacturer of the micro-controller the adapter is based on.
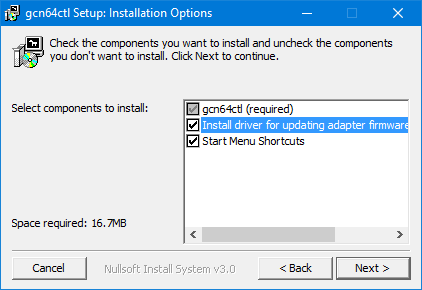
Option to install the driver (please check!)
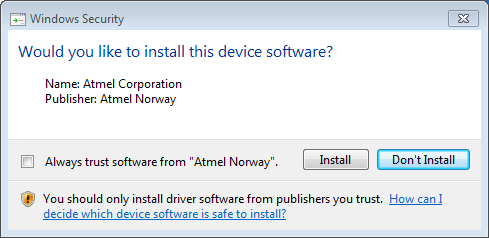
Security message: Click 'Install'
Driver installation completed
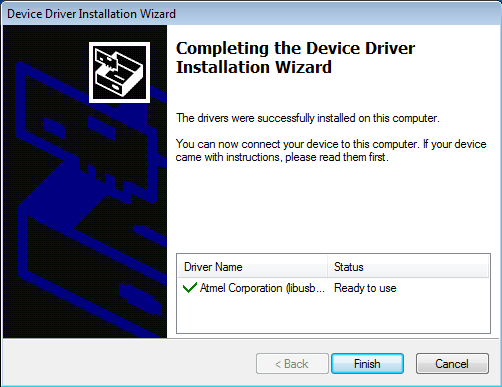
Step 3: Connect the adapter and wait
It is now the time to re-connect the adapter. At this point, if your system begins installing something, please let it finish. The appearance and exact text may vary depending on your Windows version. Here is an example: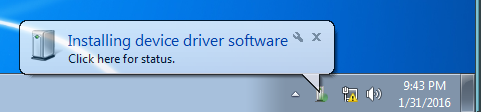
Example installation feedback
You can check that the driver was installed correctly by looking at the Device Manager. The adapter should now appear under the "Atmel USB Devices" section, under the name "ATmega32U2". If on the other hand it appears in the "Other devices" section, it means the driver was not installed (did you check the installation option and did you allow the driver to get installed?) or installation is still in progress (as shown for instance by a popup+system tray icon).
Here are screenshots demonstrating how the device should and should not appear in the Device Manager:
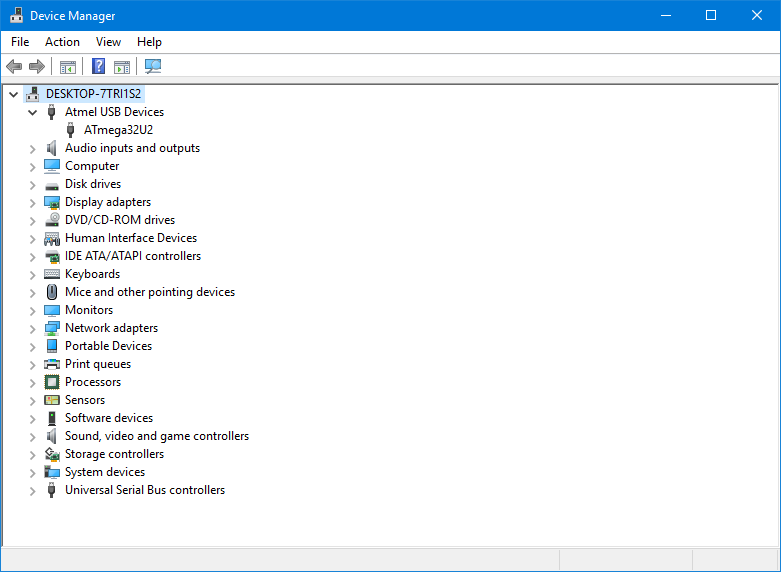
OK! (Atmel USB Devices)
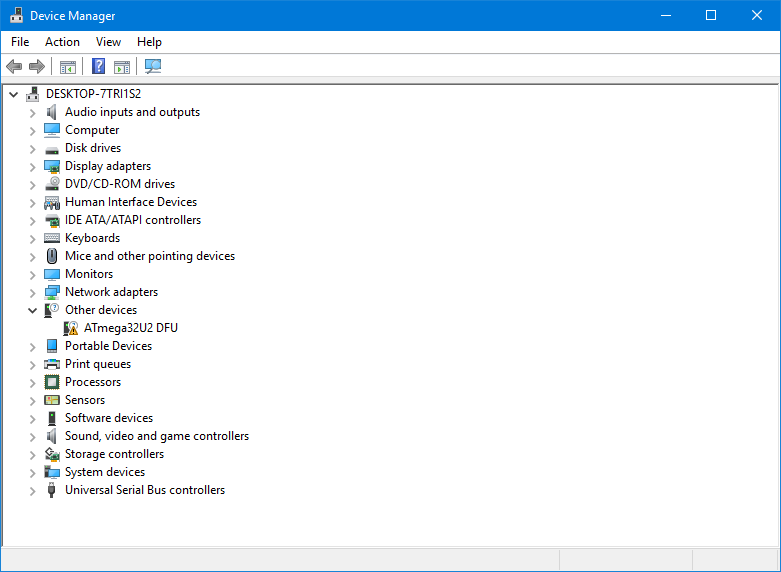
NOT ok (Other Devices)
Step 4: Attempt to recover the adapter
In the management tool, use the Recover adapter function from the Tools menu, select the adapter firmware .hex file, and click Start update.Step 5: Did it work?
Use the File->Rescan adapters function, and the adapter should be present. If not, please try the manual command-line recovery described in the next section.Manual recovery
If the instructions above did not solve the problem, try using the steps in this section.Step 1: Driver check
As described in the previous section at step 3, the driver must be installed and working. Confirm that the device is properly listed in the "Atmel USB Devices" category in the Device manager as shown below. Refer to the above section for more details.
Driver OK

Driver NOT OK
Step 2: Opening a terminal
A shortcut for opening a terminal in the adapter management tool's installation directory was created at installation. Use it to open a terminal: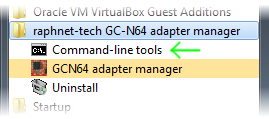
Command-line tools shortcut
This will open a terminal window in the correct working directory.
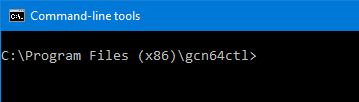
Terminal ready
From this point, please take screenshots of the terminal window after running each command, even if you
think there were no errors. If there is still a problem after performing the steps that follows, I will
really need those screenshots to understand what went wrong.
Step 3: Erasing the adapter
Run the following commands, in this order, taking a screenshot after each command.dfu-programmer atmega32u2 erasedfu-programmer atmega32u2 erase --forceStep 4: Uploading the firmware
Copy the firmware file (in this example: gcn64usb-3.4.0.hex) to the adapter manager's installation directory (Typically, "Program Files (x86)\gcn64ctl"). If you place the file elsewhere (eg: On your desktop) you will have to write the full path on the command-line. Then run the following command:dfu-programmer atmega32u2 flash gcn64usb-3.4.0.hex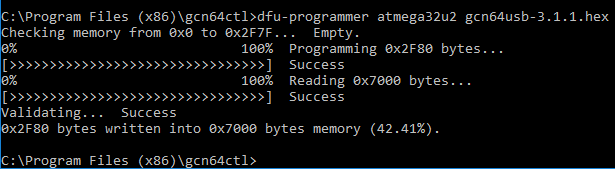
Flashed ok
Step 5: Disconnect the adapter
Once the flash command completes, disconnect the adapter and reconnect it. Start the adapter management tool to confirm the adapter is working. If it still does not work, please contact me (and include the screenshots).Transfer Pak
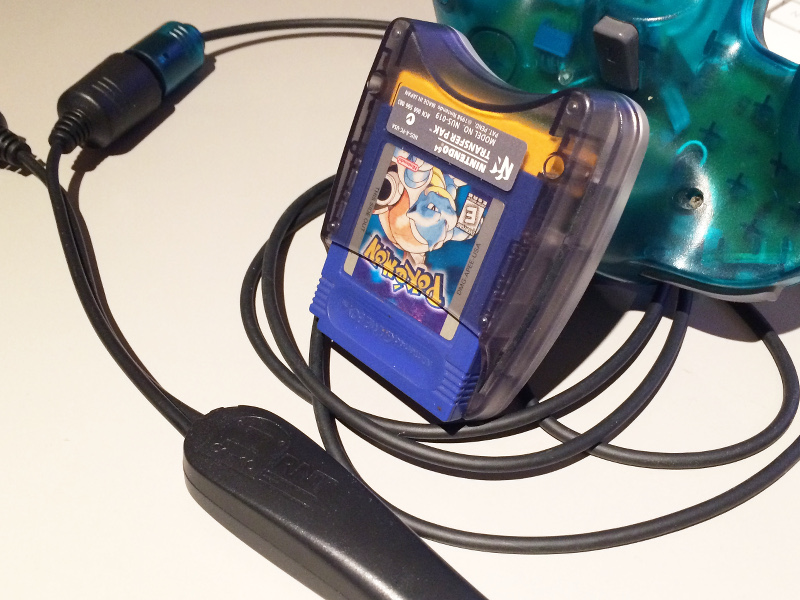
Cartridge types
There are many different Gameboy cartridge types, and only a few are supported. So far, the following types are implemented:- ROM-Only: Tetris, Alley Way
- MBC1: Final Fantasy Legend II, Nemesis
- MBC2
- MBC3: Pokemon blue
- MBC5: Mario Golf, Mario Tennis
- POCKET CAMERA: Game Boy Camera
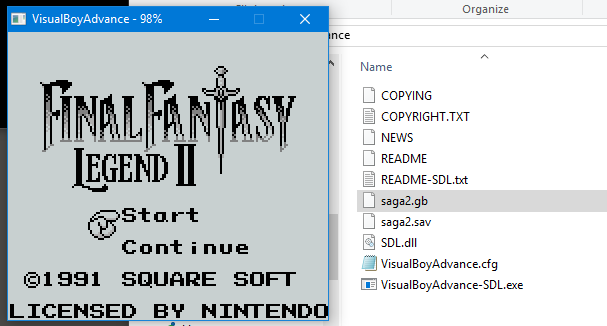
Transfering saves to an emulator
Save RAM data read using this tool is stored using the .sav file format which appears to be the standard. Start the game at least once in the emulator to create a blank save file. Then find out where your emulator stores its .sav files and overwrite the one matching the game when prompted to save the the data that was read to a file.Here is an example using VisualBoyAdvance under Windows 10. The .sav file has is created in the same directory as the ROM (the .gb file) and has the same name:
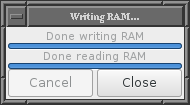
Writing emulator saves to a cartridge
Writing an emulator save game to a physical cartridge is the opposite process of what was described above. Find where your emulator stored your latest save and select it for writing to the cartridge. Data will be written to RAM first and then read back for verification.Careful!: Before writing anything to a cartridge containing precious
save data, make a backup copy and test it in an emulator (who knows if it has been corrupted
by a read error?). Whatever happens, regardless of if you made a backup or not, I am not responsible
if for some reason your saves get erased.
Disclaimer
I cannot be held responsible for any damages that could occur to you or your equipment while following the procedures present on this page. Also, I GIVE ABSOLUTELY NO WARRANTY on the correctness and usability of the informations on this page. Please note, however, that the procedures above have worked in my case without any damages or problems.Now you cannot say that I did not warn you :)