mobile8088: An elementary emulator for porting RATillery to Android
- Introduction
- Part 1: Android and Java
- Part 2: General architecture
- Part 3: Implementing the CPU
- Part 4: A First Image
- Part 5: Tandy 16 color video to Bitmap
- Part 6: Implementation errors
- Part 7: Keyboard support
- Part 8: In-game bugs
- Part 9: Optimisations for faster emulation
- Part 10: User interface
- Part 11: Being nicer to the CPU
- Part 12: Let there be sound!
- To be continued, but try it now!
Introduction
This is an ongoing project. Updates coming soon!
However, a beta version is now available. Why not try it?

Writing my own emulator is something I had been thinking of doing for a long time. However I lacked
a precise goal and a reason for not using what was already available. That is, until I decided to port
a PC game to Android (an old OUYA console actually). The game in question: RATillery,
a simple game written in 8086/8088 assembly.However, a beta version is now available. Why not try it?
I want the Android version of the game to use the assembly code from the original DOS game, because I think it is unusual and fascinating to do it that way. And I do need an emulator to make this work.
An obvious choice would be DOSBox of course, but I discarded this option for a few reasons[1]:
- I want to understand everything completely.
Nothing better than doing everything for that! - I plan to augment the game using native Android user interface elements.
I'm not sure how I'll do it exactly yet, but the idea would be to replace the letter-based menus by standard buttons. Perhaps also I could use Spinners to control the shot angle and velocity. To do this, I may have the emulator inject code in the game, replacing some subroutines by special system calls.
Using a big chunk of code (DOSBox) I did not write, one that is way too complete, powerful and complex for the simple game that is RATillery would probably make things much harder.
- I want to own all the rights to the result, so I can do whatever I want with it.
Should I ever want to sell a game using this, there would be no licensing complications.
Part 1: Android and Java
Java seems to be the easiest language to start developing on Android, thanks to the endless examples and huge collection of questions with answers that are easily found on the web, especially on Stack Overflow. As I'm new to Android development, I don't really want to try new languages or a combination of languages. So even if I feel this is a very bad choice for an emulator, I will attempt to do everything in Java.I never really liked Java much and I spent the last 18 years laughing at this language that sacrifices performance to protect the programmer against itself too much for my taste. I'll just stop there... I can't wait to see if it will be possible to emulate an old 16 bit Intel CPU running at 4.77MHz, or will even that be too slow? If so, I wonder what kind of optimisations I'll have to use. Sounds interesting.
I followed a few tutorials and guides to familiarise myself with Android, discover what's new in Java since the last time I seriously looked at the language (For instance: Generics, For-Each loops, Varargs...), and learn how one uses an IDE such as Android Studio. (I normally use vim and write my own Makefiles.. But the adaptation was easier than I expected)
When I had made enough test applications with classic "Hello World!" buttons, I dove into coding the emulator.
Part 2: General architecture
I created a class for the CPU which I named Cpu8088, as well as a few support interfaces: One for memory (Memory.class), one for system calls using the INT instruction (Int.class) and one for IO ports (IOPort.class).Creating a CPU instance is simple:
mCPU = new Cpu8088();Memory ranges
This won't do anything useful without memory! The Cpu8088 object needs at least one Memory object to work with. Here is the Memory interface:public interface Memory {
boolean isAddressInRange(int address);
void write8(int address, int b);
void write16(int address, int w);
int read8(int address);
int read16(int address);
} MemoryBlock stack = new MemoryBlock(0x400, MemoryBlock.SIZE_64K);
MemoryBlock program = new MemoryBlock(0x10000, MemoryBlock.SIZE_64K * 4);
cga_vram = new MemoryBlock(Cpu8088.getLinearAddress(0xB800, 0), MemoryBlock.SIZE_64K/2);
MemoryBlock ivt = new MemoryBlock(0, 0x400);
mCPU.addMemoryRange(program);
mCPU.addMemoryRange(cga_vram);
mCPU.addMemoryRange(stack);
mCPU.addMemoryRange(ivt);
/* Load the game executable (gametga.com) in the 'program' MemoryBlock at offset 0x100.
* (The .COM executable file format use an origin of 0x100). */
program.load(this.getResources().openRawResource(R.raw.gametga), 0x100);
- One holds the game code. The game executable (a .com file) is stored as a raw resource in the project.
- Another block pretends to be video RAM. The game will access it normally, as if it really was video memory. The Android display code will just have to read its content and convert the Tandy 16 colors format to whatever is needed on the fly.
- Yet another block is used for the stack.
- And one small block for the interrupt vector. (RATillery needs to access it to register an interrupt handler used for music.)
BIOS Services
My game calls a few BIOS services using the INT instruction. Cpu8088 accepts objects implementing the Int class.The Int interface has two methods: One to declare the interrupt number it implements, and another one to actually handle a request.
public interface Int {
	public void handle(Cpu8088 cpu);
	public int getNumber();
}
(note: The concept is not unusual for emulators)
Generally, when a service is called using the INT instruction, the sub-service is selected using the AH register. This emulator does not need to implement all possible sub-services, and it is not even required to provide a perfect or a real implementation. For instance, Int10 AH=0x0, used to select the video mode, simply returns the requested mode without any error checking. (I know which mode RATillery will set, I just need to make sure the game stays happy and does not quit thinking setting the video mode failed).
Here is the code for Int 10h, video services:
public class Int10 implements Int, Constants {
    private int current_mode = 0x03; // 80x25 color

    @Override
    public void handle(Cpu8088 cpu) {
        switch(cpu.AX >> 8)
        {
            case 0x0: // Set video mode
                current_mode = cpu.AX & 0xff;
                Log.d(LOG, "int10: Set video mode to 0x" + Integer.toHexString(current_mode));
				// return video mode in AL. (already in AL)
                break;
            case 0xF: // Get Video State
                Log.d(LOG, "int10: Get video state");
                // AH : number of screen columns
                // AL : mode currently set
                // BH : current display page
                cpu.setAH(80);
                cpu.setAL(current_mode);
                cpu.setBH(0);
                break;
            case 0xB: // Set palette
                Log.d(LOG, "int10: Set palette (ignored)");
                break;
            default:
                cpu.halt("Int10: subservice 0x" + Integer.toHexString(cpu.AX >> 8));
        }
    }

    @Override
    public int getNumber() {
        return 0x10;
    }
- Int 10h (video): Used to enter and exit graphics mode
- Int 16h (keyboard): Used to receive key events.
- Int1Ah (timer): Used to obtain the system time count, which RATillery uses to seed a pseudo-random number generator.
	mCPU.addIntHandler(new Int1a()); // Time
	mCPU.addIntHandler(new Int10()); // Video
	keyboardInt = new Int16();
mCPU.addIntHandler(keyboardInt);IO Ports
The game also touches a few IO ports (using the IN and OUT instructions). So the Cpu8088 class also knows about objects implementing the IOPort interface:public interface IOPort {
public boolean isPortHandled(int port);
public int in8(int port);
public int in16(int port);
public void out8(int port, int value);
public void out16(int port, int value);
}- Port 0x3DA: The game polls this port to detect vertical retrace. (The game uses this to run at constant speed and to avoid flickering in animations).
- Ports 0x40-0x5F, 0x61: The game controls the PC Speaker and configures the music interrupt firing speed using some of those ports.
	vcard_ports = new VideoCardPorts();
	mCPU.addIOPort(vcard_ports);
	mCPU.addIOPort(new PITPorts());
Part 3: Implementing the CPU
As one would expect, Cpu8088 has member variables for the 8088 registers, constants for the flags and lists for the Memory, Int and IOPort objects that are registered.Cpu8088 also has a void runOneInstruction() method which reads and executes a single instruction each time it is called. It is mostly a very long switch/case. Here are a few lines of it:
switch (opcode)
{
	case 0x50: push16(AX); break; // PUSH AX
	case 0x58: AX = pop16(); break; // POP AX
	case 0x40: AX = alu.add(AX, 1, ALU.WORDMODE); break; // INC AX
	case 0x34: // XOR AL,IMMED8
		immed8 = getInstructionByte();
		 setAL(alu.xor(AX & 0xff, immed8, ALU.BYTEMODE));
		 break;
	case 0xAC: // LODSB
		setAL(read8(getLinearAddress(DS_CUR, SI)));
		if ((FLAGS & DF) == DF) {
			SI = (SI-1) & 0xffff;
		} else {
			SI = (SI+1) & 0xffff;
		}
		break;
	...
}
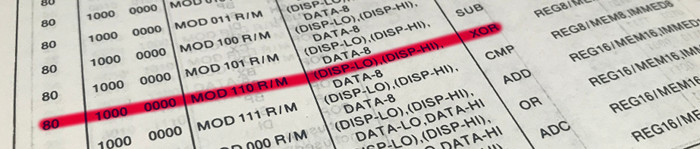
Well, this may take time. Let's only implement what we need... - Fail!
With my "8086/8088 User's Manual, Programmer's and Hardware Reference" on hand, I began at opcode 0x00 and so on, in order. But very soon, I changed my mind. I thought, well, I only use common instructions when I write assembly, I probably just need to implement a small subset. That would be faster than implementing the complete list.I made it so that the emulator stops when it encounters an unimplemented instruction, displaying its number so I know which to implement.
Past that point, here are some of my thoughts, roughly in the order they occurred:
When I finally understood what I was into, it was too late to stop. I had written too many lines. Stopping now would be a shame. And it was far from finished.- Great!! I can see CALLs and RETs are working!
- Still, I encounter unimplemented instructions a lot...
- Oh, how will I implement the REP prefix? Let's try recursion.
- Well now, there really are a lot of unimplemented instructions...
- Oh my, it's nice that many instructions can operate on memory or on registers, but it's more work for me now...
- and it actually gets worse. There may be 8 or 16 bit displacement, and it is used...
- The 0x80,0x81,0x83 instructions are hell! The following byte selects from 8 other operations.
So I did not give up and eventually the emulator stopped stumbling on unimplemented instructions. But RATillery was stuck in a loop that was polling IO port 0x3DA, waiting for a specific bit to change. This was the vertical retrace bit. I quickly modified my VideoCardPorts class to toggle the bit each time the port would be read. This is wrong, but at that point it did not matter. And thanks to this, execution did get past where it was stuck at before. But only to meet more unimplemented instructions...
A First Emulation Bug
There are times when we programmers are confronted with a program that misbehaves in ways that should not be possible, at least until we solve the mystery. In instances where the bug keeps eluding us, we may start to construct questionable theories about the problem. This is what I call "derailing". (In fact I use French: « Dérailler »). I have seen other programmers as well as myself "derail" on some occasions. In such cases, common scapegoats for the "unsolvable" bug are the CPU, the memory... in other words, the hardware! However it is extrrreeeemely rare that this really is the case. More often than not, it really is the software.I find it amusing that this time, for once, I have all the rights to suspect the hardware. The "hardware" here is.... software! And knowing that RATillery works fine on all the computers I've tried it on, and in emulators such as DOSBox, it is evident where to look first.
My first problem with the emulator "Hardware" not working properly:
A few unimplemented instructions later, the title screen code is finally reached, and it is looping peacefully, waiting for keyboard input. I can finally take a break from the CPU implementation. The byte array backing the VRAM MemoryBlock object must contain an image at this point. I want to see it!- The program is stuck forever in a loop. I look at the RATillery listing to understand where... I trace the execution instruction by instruction.... Ok, I see. Some conditional jumps do not work correctly because I got the flags wrong for some operations. Let's review everything.
Part 4: A First Image
I created a Thread that simply calls Cpu8088.runOneInstruction() in a loop. The 8088 emulation will just run as fast as it can for now. (I'll revisit later).On the user interface side, I simply dropped an ImageView into an empty Activity. In the onCreate method, I retrieve the ImageView and create a Bitmap matching the size of the game screen (320x200). I also build a lookup table for the 16 colors that are used.
	private ImageView mScreen;
	private Bitmap mScreenBitmap;
	private final int clut[] = new int[16];
	...
	@Override
	protected void onCreate(Bundle savedInstanceState) {
		...
		mScreen = findViewById(R.id.screen);

		mScreenBitmap = Bitmap.createBitmap(320, 200, Bitmap.Config.ARGB_8888);
		mScreenBitmap.eraseColor(Color.GREEN);
		mScreen.setImageBitmap(mScreenBitmap);
		...
		clut[0] = Color.rgb(0,0,0);
        clut[1] = Color.rgb(0x00, 0x00, 0xAA);
        clut[2] = Color.rgb(0x00, 0xAA, 0x00);
        clut[3] = Color.rgb(0x00, 0xAA, 0xAA);
        clut[4] = Color.rgb(0xAA, 0, 0);
        clut[5] = Color.rgb(0xAA,0x00,0xAA);
        clut[6] = Color.rgb(0xAA, 0x55, 0);
        clut[7] = Color.rgb(0xAA,0xAA,0xAA);
        clut[8] = Color.rgb(0x55, 0x55, 0x55);
        clut[9] = Color.rgb(0x55, 0x55, 0xff);
        clut[10] = Color.rgb(0x55, 0xff, 0xff);
        clut[11] = Color.rgb(0x55, 0xff, 0xff);
        clut[12] = Color.rgb(0xff,0x55,0x55);
        clut[13] = Color.rgb(0xff,0x55,0xff);
        clut[14] = Color.rgb(0xff, 0xff, 0x55);
        clut[15] = Color.rgb(0xff,0xff,0xff);

	}
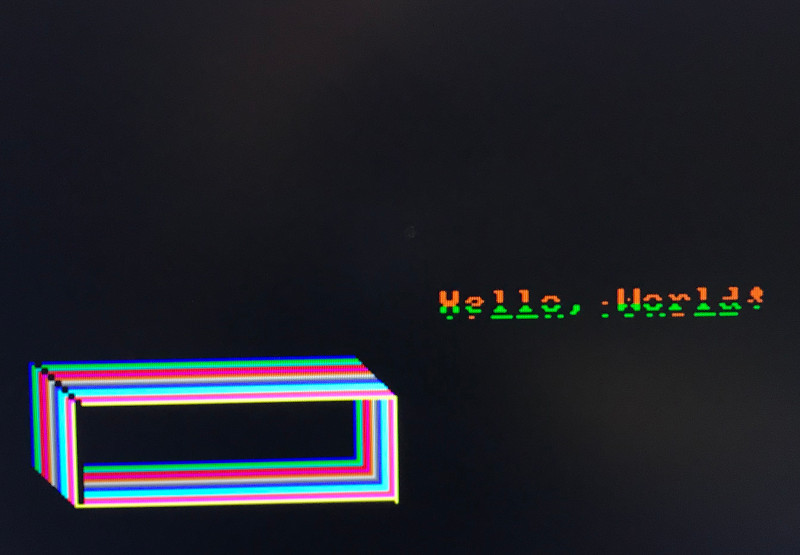
I have no idea at the moment if this is a bad idea and if there are more efficient ways to do this, but it works. I got this image:
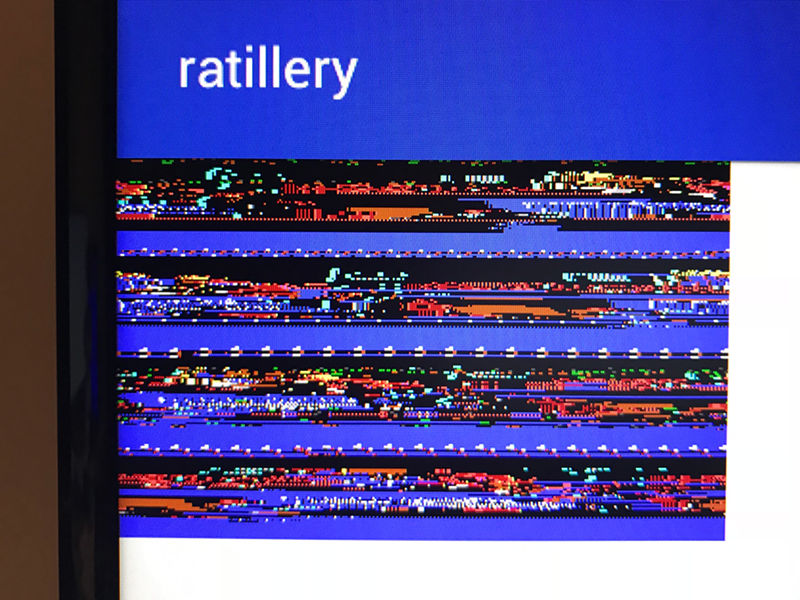
The first image
Hurrah! How thrilling it is for me to finally see something! Even though the image is wrong, this is an important and very encouraging milestone.
Part 5: Tandy 16 color video to Bitmap
The 320x200x16 video mode (16-Color Medium-Resolution)
For the moment, my goal is to support the Tandy version of RATillery. The video mode used packs two pixels per byte (4 bit per pixel):| First pixel | Second pixel | ||||||
|---|---|---|---|---|---|---|---|
| 7 | 6 | 5 | 4 | 3 | 2 | 1 | 0 |
| I | R | G | B | I | R | G | B |
Each line on the screen uses 160 bytes. In memory, however, the lines are not in consecutive order.
There are 4 groups of lines:
| Lines | Adresse |
|---|---|
| 0, 4, 8 ... 196 | 0x0000 - 0x1F3F |
| 1, 5, 9 ... 197 | 0x2000 - 0x3F3F |
| 2, 6, 10 ... 198 | 0x4000 - 0x5F3F |
| 3, 7, 11 ... 199 | 0x6000 - 0x7F3F |
A first attempt
I first wrote something similar to the code below to copy and convert the pixels from the vram byte array to the Bitmap: byte[] tandy16 = ratillery.getVRAM(); // Returns the vram byte array
for (y=0; y < 200; y++) {
for (x=0; x < 320; x+=2) {
pixel1 = tandy16[y * 160+ x/2] >> 4;
pixel2 = tandy16[y * 160 * x/2 + 1] & 0xf;
mScreenBitmap.putPixel( x, y, clut[pixel1] );
mScreenBitmap.putPixel( x+1, y, clut[pixel2] );
}
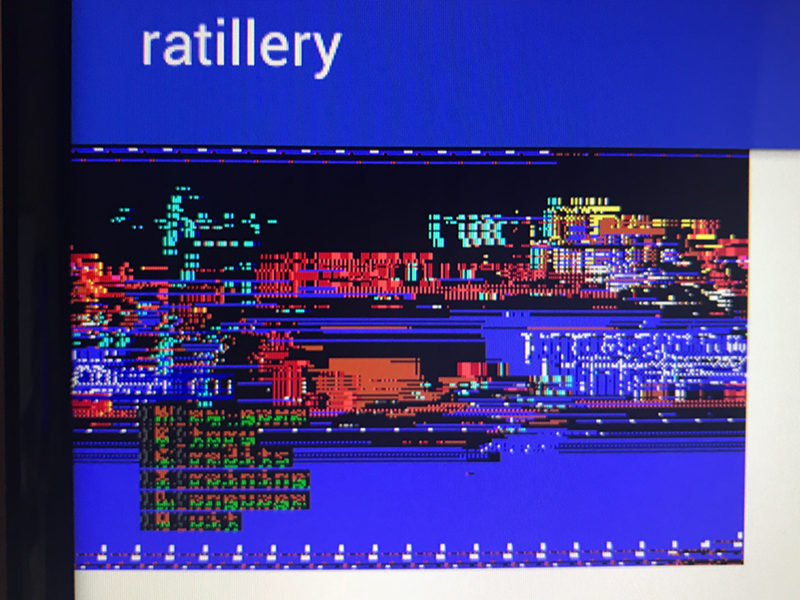
}Attentive readers may notice that the code above completely ignores what I just wrote about there being 4 groups of lines. And this is why the first screenshot looks like 4 squashed copies of the screen distributed vertically. I don't know what I was thinking, overlooking something like that!
The Correct Way
I reworked the code to do things line-by-line where a int[] array is filled and then passed to Bitmap.putPixels(). This is probably faster, but I plan to time execution and try a few things later. It may be possible to do better... For instance, is it useful in Java to move calculations with a fixed result (such as y*160) outside the loop? Is there something to gain by replacing multiplications and divisions by shifts where possible? Does the compiler understand that accesses to tandy16[] will never be out of bound so no need to check before every single access? I look forward to finding out answers to those questions.For the time being, here's what the reworked code looks like:
	private int rowbuf[] = new int[320];
...
	private void doScanline(byte tandy16[], int src_offset, int screen_y)
	{
		int x;
		for (x=0; x<320; x+=2) {
			int pixelpair = tandy16[src_offset+(x/2)] &0xff;

			rowbuf[x] = clut[pixelpair >> 4];
			rowbuf[x+1] = clut[pixelpair & 0xf];
		}
		mScreenBitmap.setPixels(rowbuf, 0, 320, 0, screen_y, 320, 1);
	}

	private void syncVram() {
		int y;
		MemoryBlock vram = ratillery.getVRAM();
		final byte[] data = vram.getRawBytes();

		for (y=0; y<50; y++) {
			doScanline(data, 0 + y * 160, y * 4);
		}
		for (y=0; y<50; y++) {
			doScanline(data, 0x2000 + y * 160, y*4 + 1);
		}
		for (y=0; y<50; y++) {
			doScanline(data, 0x4000 + y * 160, y*4 + 2);
		}
		for (y=0; y<50; y++) {
			doScanline(data, 0x6000 + y * 160, y*4 + 3);
		}
	}
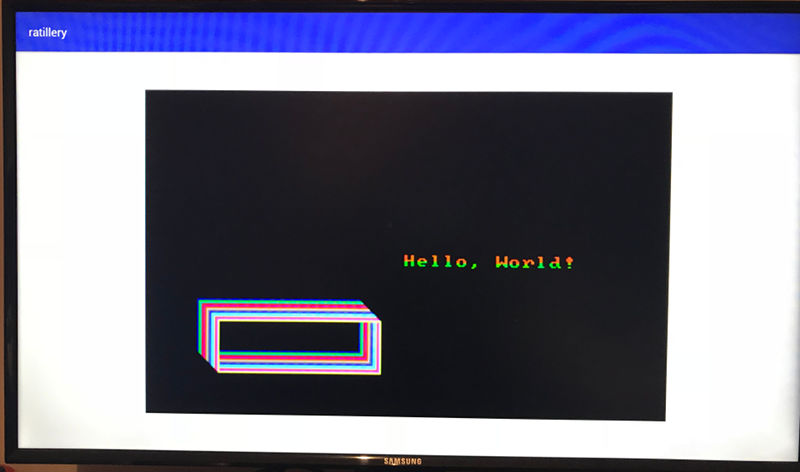
First screenshot
Second screenshot
Slowly getting there. The menu test is in the right spot, albeit not legible. Strange... But the problem was in the CPU implementation.
Part 6: Implementation errors
Let's use a simple test program
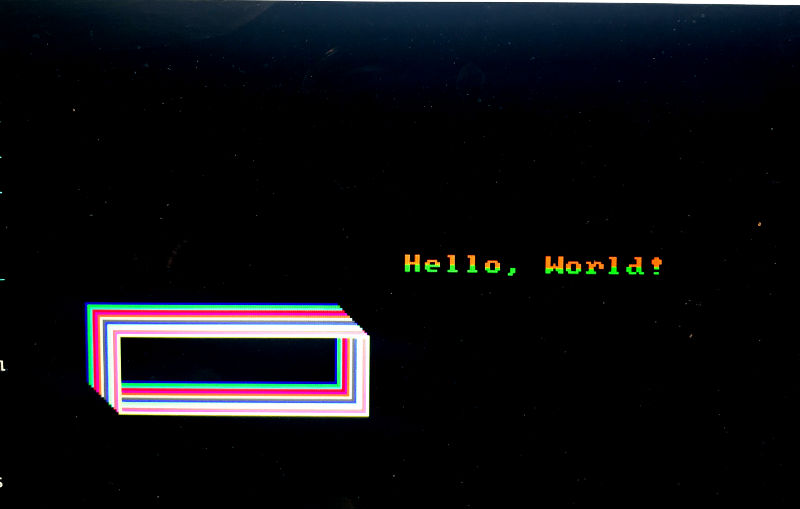
Using RATillery to troubleshoot was complicating things and muddying the waters. So I switched for a simple test executable which displays a few color frames and a line of text. Nothing else.This test program, when running on a non-buggy emulator, displays this screen:
The simple test running in DOSBox
But in my emulator, all I got was a black screen. I found the reason in the logs:

That's it. Unimplemented instructions are back...
This time, it was the flavor of XOR that accepts a 8-bit immediate value...
After adding a few other instructions, the test screen comes up, but incorrectly. After a few minor corrections, the text was almost OK.
Simple test (incorrect result)
Anomaly 1: Extra lines in the text!
No, this is NOT Standard Galactic Alphabet:
The test program uses the same 8x8 font RATillery does. So why can I see 10 lines?

It took me a very long time to find the cause (a very simple and basic thing of course) and only a few seconds to correct it.
What an idiot! The LOOP instruction decrements CX before checking if it is zero! And the manual was quite clear on this...
So yes, some loops were doing extra laps...
Anomaly 2: Missing pixels in the frame
I also spent a good amount of time trying to understand why a few pixels were missing in action in the upper left corner:
The problem was my STOSB implementation. Can you spot my mistake?
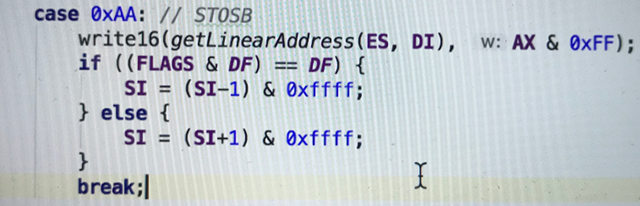
STOSB wires AL to ES:DI, then increments or decrements DI. Why am I touching SI exactly? I blame lack of sleep and the cut-and-paste functions.
Test OK
Back to RATillery:

...too bad. The background is stored in a compressed format, so it must be that the decompressor is not happy about something. But at least, the text is working fine now, and the fire animation is running.Oh no! I was hoping everything would be fine now...
Where is my error now? I had to dig into the decompression code for clues. A few hours later:
After correcting this:Ah ha! My implementation of the REP prefix is incorrect when CX = 0
When CX=0, the instruction that follows (for instance, MOVSB) was still executed 1 time!
Victory! Another important milestone: The game correctly displays the title screen!
Next step: Add a way to simulate key presses to start the game.
Part 7: Keyboard support
At last, instead of passively observing glitches and encountering unimplemented instructions, the time has come to interact with the game, and then observe new glitches and more unimplemented instructions!The game uses the BIOS keyboard services provided by the Int16 class. I've implemented single keystroke event queue. (to be revisited later):
public class Int16 implements Int {
	// TODO : Need a FIFO
	private boolean hasKeystroke = false;
	private int scancode;

	public void injectKeyStroke(int scancode) {
		this.scancode = scancode;
		hasKeystroke = true;
	}

	@Override
	public void handle(Cpu8088 cpu) {
		switch(cpu.AX >> 8)
		{
			case 1: // Get keyboard status
				if (hasKeystroke) {
					cpu.AX = scancode;
					cpu.FLAGS &= ~cpu.ZF;
				} else {
					cpu.AX = 0; // scancode (none)
					cpu.FLAGS |= cpu.ZF;
				}
				break;
			case 0: // Note: This is incorrect as it does not block.
				cpu.AX = scancode;
				hasKeystroke = false;
				break;
			default:
				Log.e(LOG, String.format("int16: service AH=0x%02x not implemented", cpu.AX >> 8));
		}
	}

	...
}
A temporary UI
For the end result, I have something better in mind than merely placing lots of buttons around the emulated screen. But this will come later. For now, I just need a way to continue testing quickly.So I first added a bunch of buttons to the UI to quickly try the game. Each button simply ends up calling the
injectKeyStroke() method with the ASCII character
corresponding to the button. Scancodes are normally 16 bit values where the lower
part is the ASCII character and the upper part corresponds to the physical ID of
the key on the keyboard. I know RATillery only looks at the lower 8 bits, so
this simple approach works.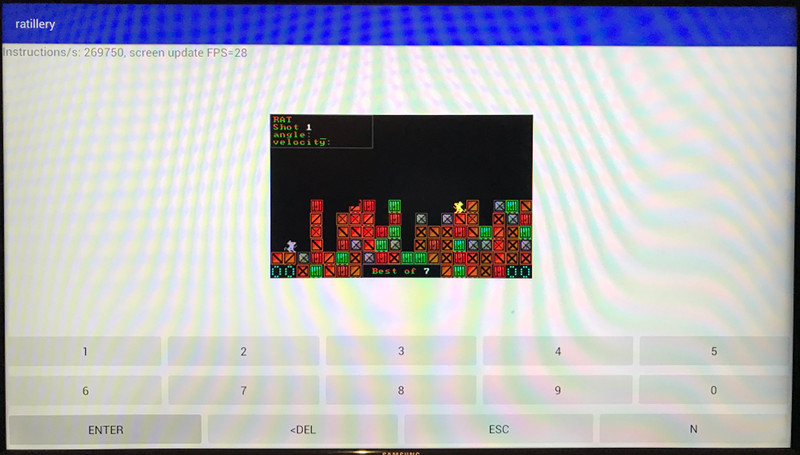
HID Keyboard support
Later I wanted to open the story and credits screen, but this requires the S and C keys. Instead of adding buttons, I decided to connect a USB Keyboard to the OUYA console I'm using for development. Transferring keystrokes to the game was a simple matter of overriding theonKeyUp
method in the Activity: @Override
public boolean onKeyUp(int keyCode, KeyEvent event) {
int unichar = event.getUnicodeChar();
if (unichar >= 32 && unichar <= 128) {
ratillery.pressAsciiKey((char)event.getUnicodeChar());
}
// extra code for ESC, ENTER and BACKSPACE keys not shown
return true;
}
Part 8: In-game bugs
So I started a game, and it mostly worked! There were a few things I had to fix though.1 - It's always player 1's turn.
This subroutine makes the value of [player_turn] alternate between 0 and 1:togglePlayerTurn:
push ax
mov al, [player_turn]
not al
and al, 1
mov [player_turn], al
pop ax
ret
NOT byte [player_turn], possibly in a macro...
The code above is known to work, despite it's superfluous complexity. So why wouldn't turns alternate? The NOT instruction was not implemented! This had not been caught due to a missing break in a switch/case.
2 - Cannot quit game

Pressing ESCAPE, and then confirming that I really want to quit the game by pressing Y did not work. The game would just go on as if I'd said no. What was wrong? I instantly suspected flags/alu incorrectness.
In RATillery, there is a subroutine called
askYesNoQuestion. It returns 0 in CX if no was the answer, 1 in CX if yes was the answer. After
calling it to confirm quitting, the game adds 0xffff to CX in order to set the carry if the value returned in CX is non-zero. (the carry
flag is then checked later, after CX has been reused)By adding a breakpoint right after this addition, I could see that CX = 0. That's correct since 1 + 0xffff overflows to 0 in a 16-bit register. But only the zero flag was set! Why not the carry flag?
This addition was done using:
AND CX, 0xFFFFJava does not have unsigned integers, and I decided to use ints (32-bit) everywhere instead of unsigned shorts, only using the lower 16 bits. It turns out that the way I did the sign extension gave a 32 bit result. So the integer holding the sign extended immediate contained -1 (0xffffffff) instead of 0xffff.
This potentially does not matter, as it does not change the 16 lower bits and adding 1 and 0xffff gives the same result as adding 1 and -1, if you only look at the 16 lower bits. But it breaks my code that decides if the carry flag must be set:
int add16(int a, int b) {
	int result = a+b;

	if (result > 0xffff) {
		// set CF flag here
	} else {
		// clear CF flag here
	}

	// Code for other flags (OF, SF, ZF) not shown

	return result & 0xffff;
}3 - The credits screen does not display completely
It stops right in the middle of writing my first name! As I thought, the French ë letter was the culprit. And this was once again a case of unimplemented instruction (this time, it was SUB REG8/MEM8, IMMED8).
Part 9: Optimisations for faster emulation
I could tell by looking at transition effects between screens that the CPU emulation was running a bit slower than it should, so I decided to have a go at optimising stuff.The emulator thread runs the CPU in blocks of 250 instructions. It monitors how much time has elapsed using System.nanoTime. Each time 15.5ms has elapsed, it calls a function that changes what io port 3DA reads (that's the register indicating, among other things, vertical refresh.) and run the CPU for another 250 instructions. Then the value of 3DA returns to "not in retrace". So the game logic and animation should be running more or less at 60fps (1s / 60 = 16.66667ms).
I decided to use the title screen as a benchmark, since there are a few things going on: There is screen drawing for the 32x32 fire animation, vertical retrace is polled (through a IO port) to keep speed constant, and BIOS services are called to detect keystrokes.
In order to measure performance, I have code to count how many instructions are executed in a slice of 1 second. A 15 second average is used to stabilize the reading of instructions per second (IPS) displayed on-screen.
I started by changing the Debuggable option to false in the build type settings. IPS increased to 278000. A very small difference, I was hoping for more. Not worth it.All right, initial IPS reading of 280000. Let's see what I can do.
Then I thought: the title screen code is polling port 3DA a lot. The IOPort handlers are stored in an ArrayList. Each time a port must be accessed, the code has to iterate over the list, calling each IOPort object's
isPortHandled(int) method until it finds the correct IOPort object.
This is a lot of method calls. There are in theory 65536 ports. That's not too much to use a lookup table nowadays in this land of supercomputers. So I did that.
I asked myself, what else is being done repeatedly? Memory accesses, of course! And similarly, an ArrayList of Memory objects was used to find an instance handling the source or destination address. Why not also use a lookup table? The 8088 has a 20 bit bus, which means it can only address up to 1 Megabyte. The LUT would need 1 million entries... Assuming Java object references are 64 bit pointers, this table will occupy 8 megabytes in memory. So I accepted the tradeoff and implemented that idea too. Here is what it looks like:LUT for IOPorts: IPS of 317000. Nice, 13% faster. Now what else?
Memory memoryZones[] = new memoryZones[0x100000];Was there anything else that could provide a significant speedup? Yes! In many places, the correct Memory object for performing an access is found by first calling a function (eitherLUT for Memory: IPS of 1384000. Excellent, a very nice 400% improvement right there!
getMemForAddress(int seg, int offset) or getMemForAddress(int linear_address).
Those used to iterate over an ArrayList of Memory objects, calling isAddressInRange on each object until the one handling the
particular address was found. But now that there is a lookup table, all those do is return memoryZones[address];Cpu8088 has methods for reading or writing memory, like this:
	private Memory getMemForAddress(int address) {
		return memoryZones[address];
	}

	public int read16(int address) {
		return getMemForAddress(address).read16(address);
} public int read16(int address) {
return memoryZones[address].read16(address);
}Ok, so more than 7 times faster so far. But why stop here? More inlining would be possible, but I decided to keep read8/16 and write8/16 and not inline them because they are useful and used in many places. But I can still inline them in places where I think it matters.And what do you know! IPS went up to 2003000 by inlining methods!
Cpu8088 has a few methods that are used to read from the instruction stream. In other words, read from CS:IP, then increment IP:
- getInstructionByte()
- getInstructionWord()
- getInstrcutionInt16()
- getInstructionSX()
public int getInstructionWord() {
	int b = read16(CS, IP);
	IP = (IP + 2) & 0xFFFF;
	return b;
}public int getInstructionWord() {
int b = memoryZones[(CS<<4)+IP].read16(CX, IP);
IP = (IP + 2) & 0xFFFF;
return b;
}I am not willing to inline the getInstructionX() methods, it becomes too messy. At some point, maintainability and readability starts to matter. But I decided to inline at least the getInstructionByte() call that was used by the huge opcode switch/case because I know it's called a lot (over 2 million times per second right now).Not bad, IPS is now 2227600
If you read this far, I'm sure you get the idea by now. I continued inlining a few things where I judged it an acceptable tradeoff. Then a bit later...The effect: Now running at 2599800 IPS
This is 9.64 times faster than in the beginning. I decided to stop here, for now at least, since I'd like to work on other aspects of the project.Final result: 2700000 instructions per second
Ideas for the future?
There are other optimisations I know I could try. One change that would likely provide a huge performance boost would be to use a single byte array for all memory. In other words, do away with having multiple Memory objects for different zones, reducing indirection by not needing to access it through a Memory instance. (And using less memory, since the huge 8 Megabyte lookup table won't be required anymore).Ok, as I wrote this I couldn't resist and did it. Now at 3545000 IPS! (More than 12 times the original speed)
Another interesting trick with good potential would be to implement repeated string instruction (for instance, REP STOSB) in Java directly. This means looking at what instruction is being repeated, and doing the equivalent loop in Java (for REP STOSB/STOSW/LODSB/LODSW), or even calling System.arraycopy() in the case of REP MOVSB/MOVSW (using a single byte array for memory as suggested above would make this easy).
Ok, I'll really keep this one for later, if graphics are too slow.
Part 10: User interface
So at this point, the game was working fine on my OUYA console. With an USB keyboard connected, it felt just like playing the game on a PC.Indeed, except for maybe a few on an Android box with an alphanumeric remote control, the input device most people will have is a touch screen. And it will be small, so popping up the virtual keyboard is out of the question.Let's be realistic. Most people will want to use a phone.
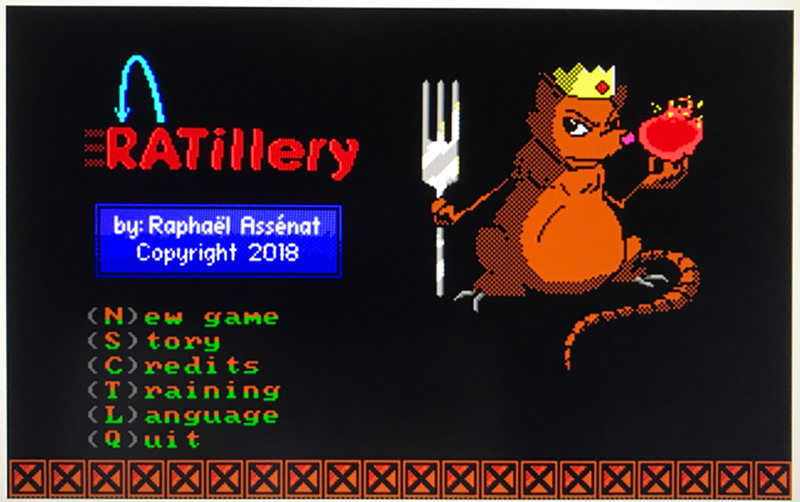
Title screen
I began with the title screen and populated the interface with buttons for all the keys one may need to press at this stage of the game. On a keyboard, one would press N for new game, S for story, and C for credits. But rather than labelling the buttons N, S and C, as on a keyboard, I named them directly after their function (New game, Story and Credits).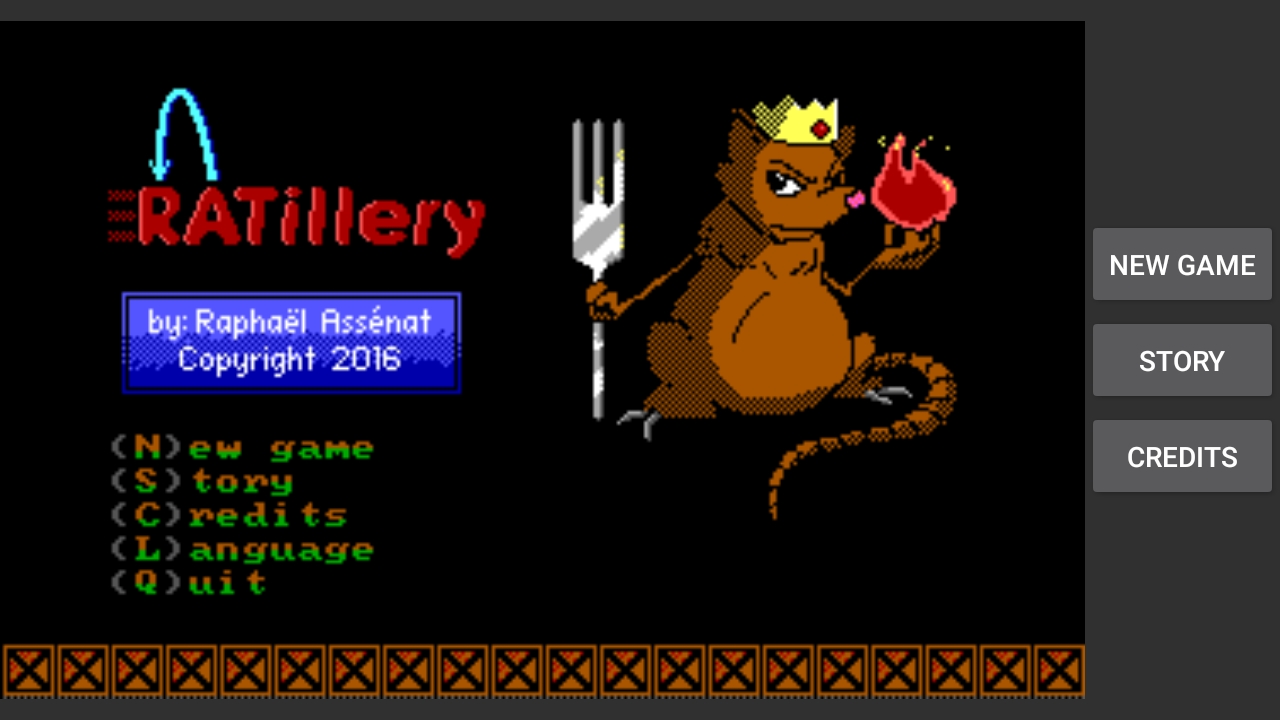
As a first step, it was not bad. There was enough space for the game display area to grow almost to its maximum height. But there was redundancy and a bit of incoherence: Why is there a menu text when there are buttons? Why no button for changing the language and quitting?
The language will switch depending on the device settings. And as most Android applications, quitting will be accomplished using the task manager. So those two menu options are irrelevant in this version of the game.
But what about the other menu items? I thought about it, and after a while my conclusion was that I should either support clicking on the menu items directly (and do away with the buttons) or remove the menu and keep the buttons. I chose the later. To hide the menu, I write NOPs (and instruction that does nothing) over the code that handles drawing it. (If a keyboard is connected, however, the menu stays in place and the buttons do not appear).
That was better, but the title screen felt a bit empty....
so a few minutes later...And then it stroke me: The buttons should be where the menu was!
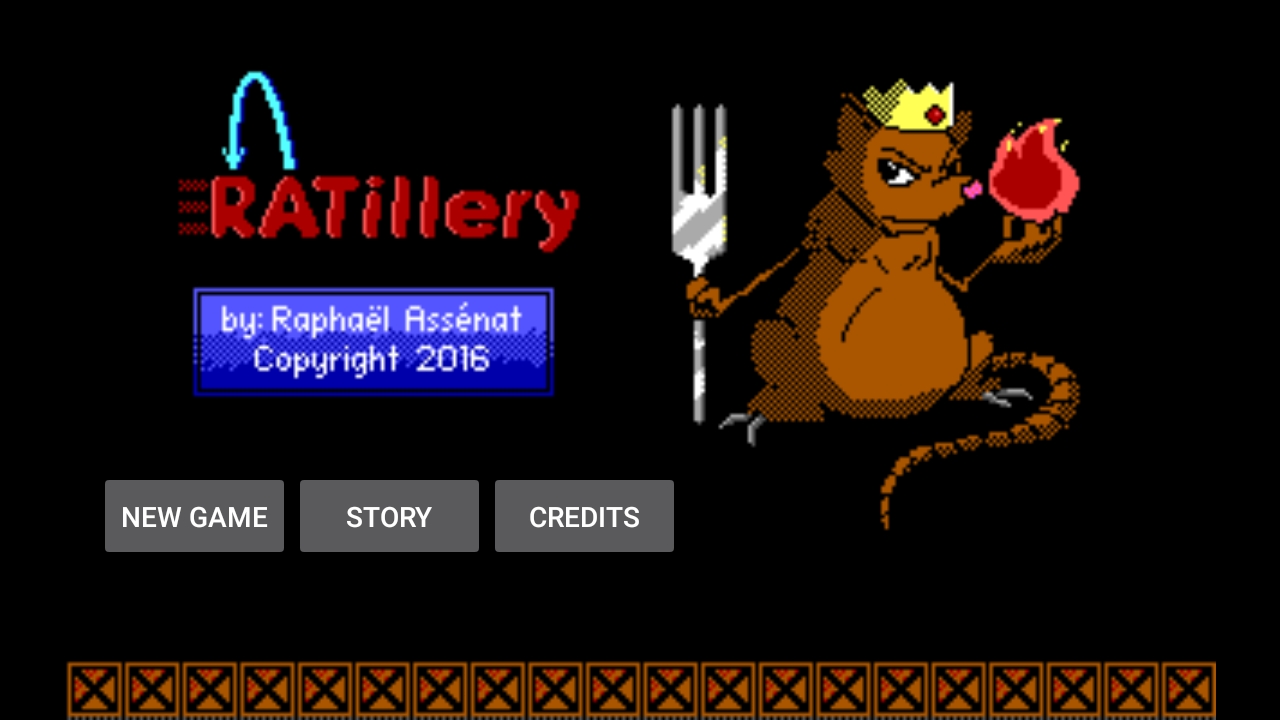
Really, much better!
But those buttons had to be hidden when displaying the story and credits screens, and of course they had to come back when returning to the title (by pressing any key).
I was able to do it by simply using normal UI events, without modifying the game or adding special features to the emulator. The logic is:
- Then Story or Credits is pressed, inject a S or C key event, then hide the buttons.
- When clicking on the screen, inject a SPACE key event, then make the buttons visible again. (In the title screen, hitting SPACE has no effect and the buttons are already visible.)
- When the user presses the BACK button on his phone, inject a SPACE key event, and make the buttons visible again. (Here also, no effects in the title screen)
// Called when the Story button is pressed
public void doStory(View view) {
	ratillery.pressAsciiKey('s');
	mButtonBox_title.setVisibility(View.INVISIBLE);
}

// Called when the Credits button is pressed
public void doCredits(View view) {
	ratillery.pressAsciiKey('c');
	mButtonBox_title.setVisibility(View.INVISIBLE);
}

// Called when the screen is clicked/touched
public void onScreenClicked(View v) {
	ratillery.pressAsciiKey(' ');
	mButtonBox_title.setVisibility(View.VISIBLE);
}

// Called when a keyboard key is pressed (includes buttons on the device)
public boolean onKeyUp(int keyCode, KeyEvent event) {
	if (keyCode == KeyEvent.KEYCODE_BACK) {
		// in Story or Credits, cause the game to go back to the menu
		ratillery.pressAsciiKey(' ');
		mButtonBox_title.setVisibility(View.VISIBLE);
		return true;
	}
	...
}
Pre-game options
Here is the original options screen one must go through before each game: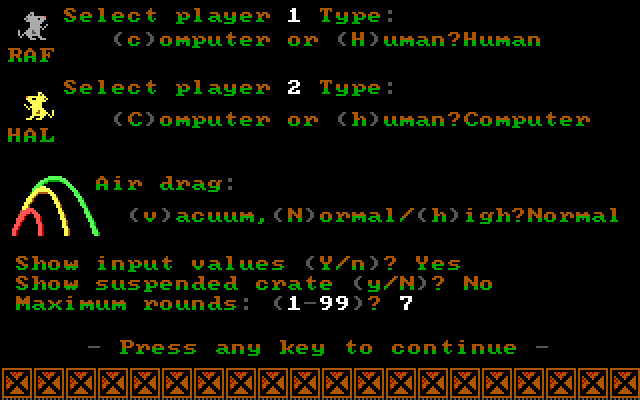
This pretty much requires an alphanumeric keyboard, especially for writing the player names and entering the number of maximum turns. So it felt it would be easier to replace everything by standard Android UI elements.
Clicking on the New Game button in the title screen launches a new Activity with almost all the original options:
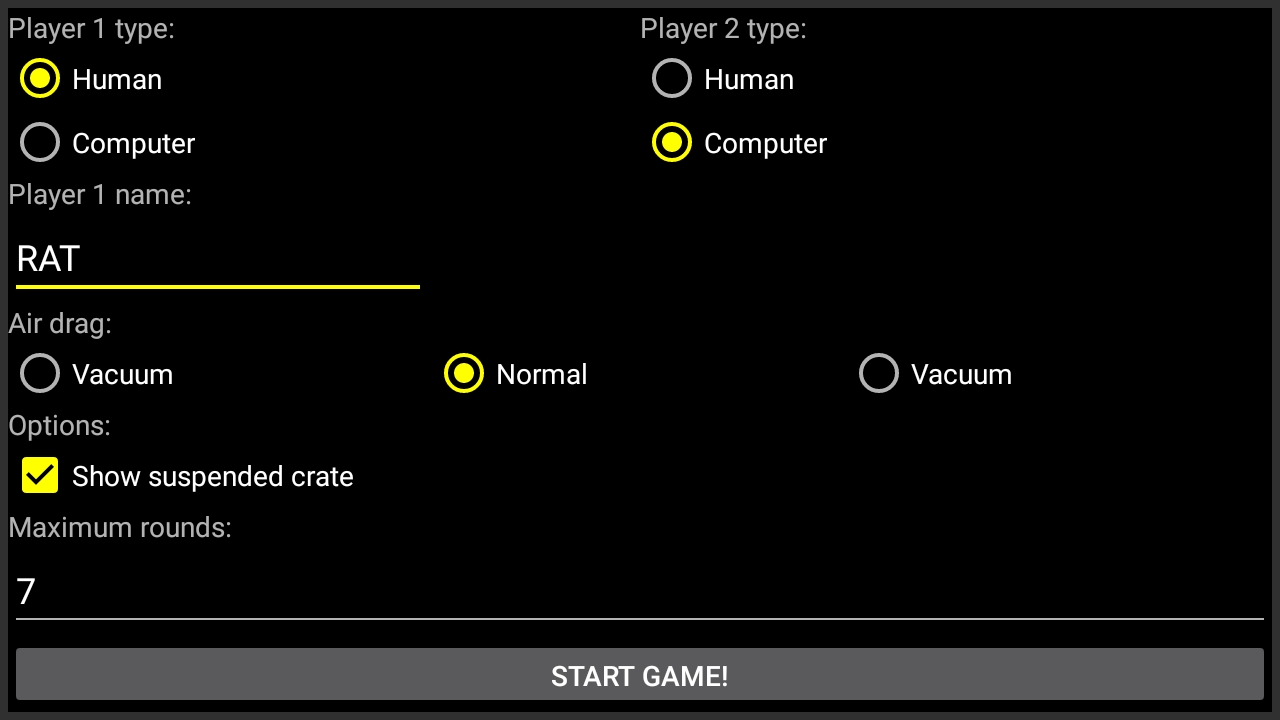
To me it feels a bit off, and I miss the rats and air drag icons. I may revisit this later, but it does the job for now. When the user presses Start Game, a quick series of keystrokes are injected into the emulator, as if the user was making his choices ludicrously fast.
In game!
Rather than using a numeric keypad which I feared might consume too much space and cause the game screen to shrink (unless I made it very small) I thought using a pair of NumberPickers plus a fire button would be good. One advantage is that the angle and velocity may be adjusted in any order. With a keyboard, one has to switch between the fields using the TAB key. Would I have had to place a TAB button somewhere? Or make it possible to move the focus by touching the words "angle" and "velocity" directly in the game area? (hmm.. Those thoughts are not unlike those I had when working on the title screen...)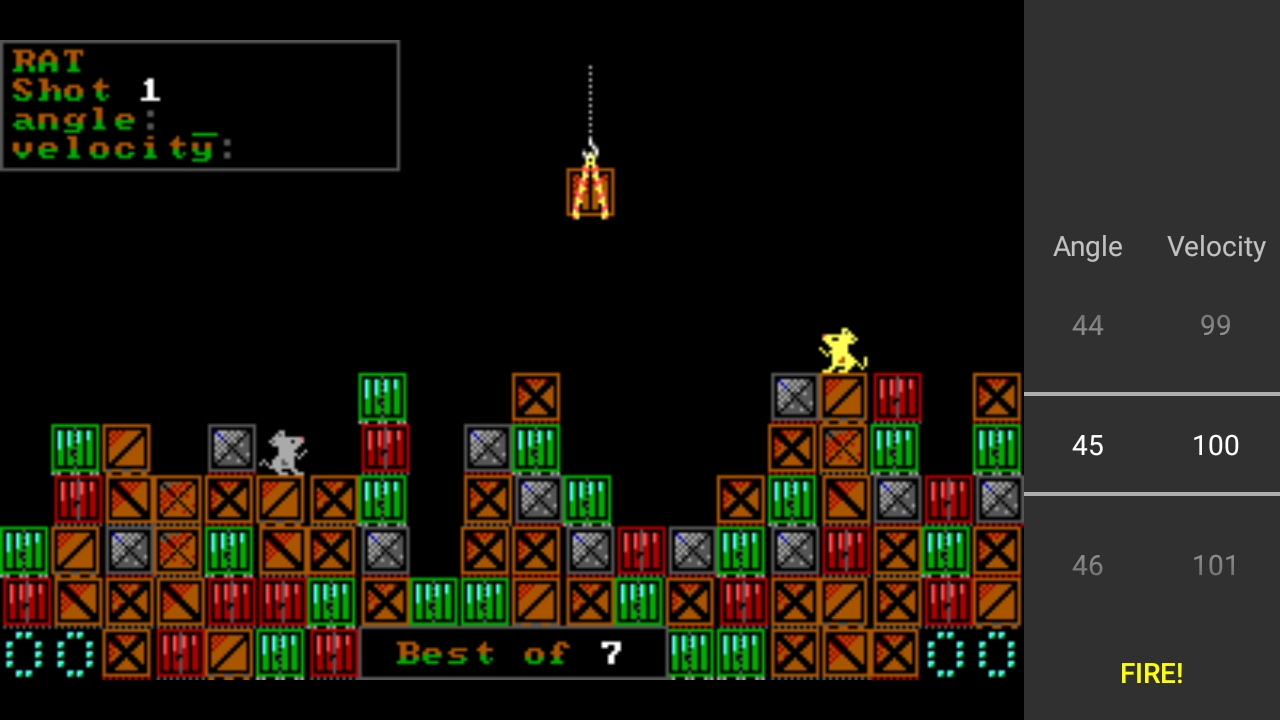
When the player presses the Fire! button, the values selected by the NumberPickers are quickly injected as keystrokes. The input box is not used, so perhaps it would be better not to draw it. However, its purpose is also to indicate which player's turn it is by appearing in the left or right corner of the screen... However I think I could replace it by an arrow pointing the rat and move the player name and shot number in the empty space above the NumberPickers...
Dialog boxes
When the player hits the ESCAPE key during a game, RATillery asks the user to confirm by pressing Y or N. As I did not want to add permanent Yes and No buttons to the user interface to ack as the Y and N keyboard keys, I used a standard Dialog box.I will need to prevent the old message from appearing in the background, but for now at least it does not stand out too much thanks to the darkening effect applied by the dialog box.
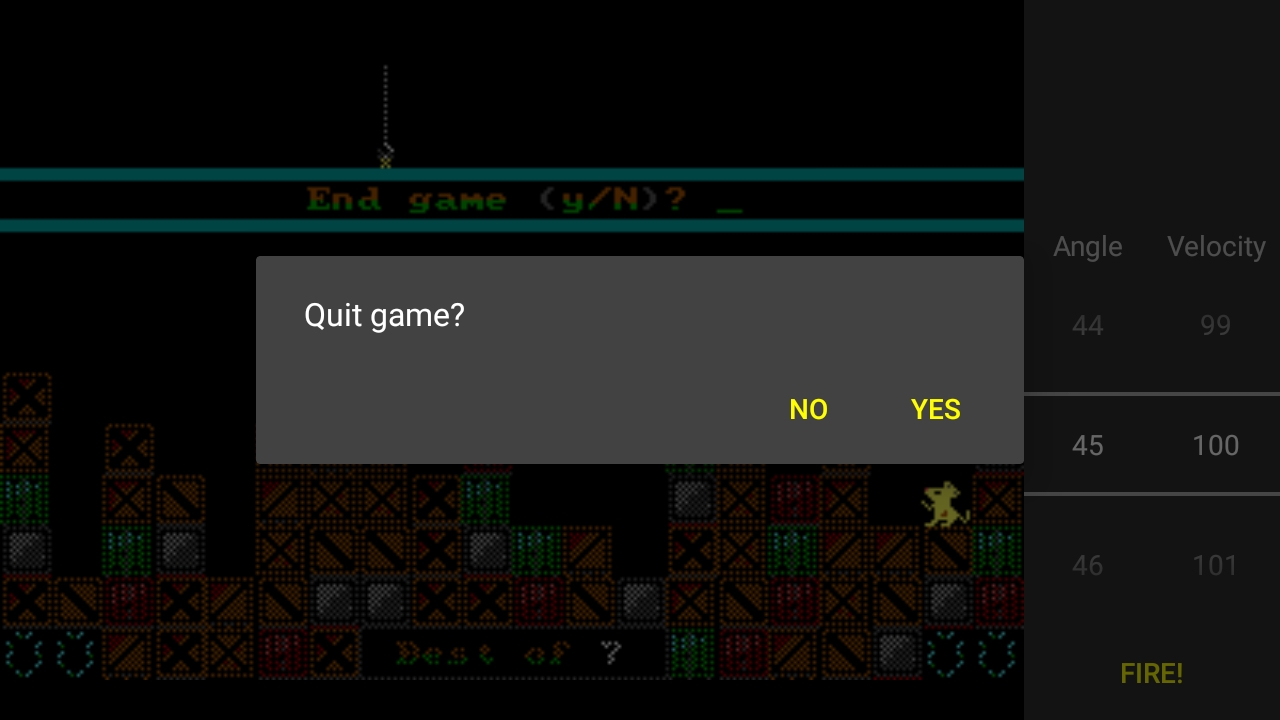
In order to bring up the dialog box with the right message at the right time, I have added a feature to my emulator which raises events when code from a specific address executes. It's like breakpoints without the break:
- When the game asks quitting confirmation
- When the game asks "play again?"
- When the fire ball hits something
Part 11: Being nicer to the CPU
Right now, even when there is nothing to do, the game uses all available CPU time (limited to 1 core). The games synchronises on the vertical refresh by polling an IO port in a loop, so this is an expected (but unwanted) side effect.As an example, consider the title screen:
In this screen, the game must monitor the keyboard for activity and update the fire animation (a 32x32 sprite) about 10 times per second. The logic is as below:
- Wait for vsync (occurs 60 times per second, or every 16.67ms)
- Update the fire image if it is time (there is a counter to keep track of the animation)
- Check if any keys were pressed
- Back to step 1
Inside RATillery, all this polling occurs in the waitVertRetrace function.
Here is its listing:
  2458                              <3> waitVertRetrace:
  2459 000009BE E86FFA              <3>     call runAnimations
  2460                              <3> waitVertRetraceNoAnim:
  2461 000009C1 F606[9E00]FF        <3>     test byte [skip_vert_retrace], 0FFh
  2462 000009C6 7511                <3>     jnz _skip_vert_retrace
  2463                              <3>
  2464 000009C8 50                  <3>     push ax
  2465 000009C9 52                  <3>     push dx
  2466 000009CA BADA03              <3>     mov dx, 3DAh
  2467                              <3> _waitNotInRetrace:
  2468 000009CD EC                  <3>     in al, dx
  2469 000009CE A808                <3>     test al,08h
  2470 000009D0 74FB                <3>     jz _waitNotInRetrace
  2471                              <3> _notInRetrace:
  2472 000009D2 EC                  <3>     in al, dx
  2473 000009D3 A808                <3>     test al,08h
  2474 000009D5 75FB                <3>     jnz _notInRetrace
  2475 000009D7 5A                  <3>     pop dx
  2476 000009D8 58                  <3>     pop ax
  2477                              <3> _skip_vert_retrace:
  2478 000009D9 C3                  <3>     ret
- The runAnimation call executes a simple animated object manager (used for animating the rats' tails)
- There are two entry points: waitVertRetrace and waitVertRetraceNoAnim. The latter skips the call to runAnimation.
- The skip_vert_retrace variable is sometimes used to forego actually waiting for vsync (used in some circumstances)
Which means, in more specific terms:Objective: Temporarily suspend emulation whenever waitVertRetrace is called.
A good way to acheive this is to implement a wait for vsync interrupt and have it called by waitVertRetrace. Why not use 80h as it is free? (Reminder: When an int XX instruction is executed, this emulator calls a java method)Replace this wasteful polling by a call to Thread.sleep(milliseconds)
We must insert the INT 80h instruction somewhere in waitVertRetrace. Address 09C8 (push ax) is the perfect spot. The code there will be replaced by INT 80h followed by a return (RET). The two entry points will still function as intented, and the "no wait" mode will also work.
Here is the Java code to patch the program as described:
private void patchWaitVsync()
{
        byte[] prg = mProgram.getRawBytes();
        int offset = 0x09C8 + TEXT_START;

		// Just a quick sanity test
		if ((prg[offset] & 0xff) != 0x50) {
            logE("Invalid address for patch wait vsync : Found 0x" + Integer.toHexString(prg[offset]));
        } else {
			// INT 80h
            prg[offset] = (byte)0xCD;
            prg[offset+1] = (byte)0x80;
			// RET
            prg[offset+2] = (byte)0xc3;
        }
}
public void handleInt(int number) {
	if (number == WAIT_VSYNC_INT_NO) {
		waitingForVSYNC = true;
		mCPU.suspend();
	}
}
	time_since_last_retrace = System.nanoTime() - prev_retrace_ts;
	time_to_next_retrace = (16670 * 1000) - time_since_last_retrace; // 16.67ms

	realSleep(time_to_next_retrace / 1000); // a wrapper around Thread.sleep which accepts microseconds

	waitingForVSYNC = false;
	mCPU.resume();
Note: My phone model has 4 cores. The 30% is explained like this: 25% for the CPU emulator thread, which was running non-stop, and about 5% for the display thread (on another core).
Part 12: Let there be sound!

A glorious PC speaker specimen
It was therefore high time to add the pieces required to get the Android version of RATillery output sound: PIT (Programmable Interrupt Timer) emulation, as two of the 3 timer channels of this chip play major roles in RATillery:
- Channel 0: Raises an interrupt at 59.9 Hz: Used as a time base for music playback
- Channel 2: Generates a square wave for the speaker: The frequency is changed to play notes.
PIT Channel 0
This timer can be used to generate interrupts of configurable frequency. Normally set at 55ms intervals (or 18.2 times per second), the playback routine used by RATillery changes it to about 60Hz and installs an interrupt handler (irq 0 / int 8) which is then called 60 times per second. Each time it is called, the song is advanced by 1 time unit.PIT Channel 2
The output of this channel is sent to the speaker. The interrupt handler for channel 0 takes care of changing the output frequency at the right moment.Implementation
Somehow I had to get the emulator to call the playback routine's interrupt handler 60 times per second. In the previous section (Part 11: Being nicer to the CPU) I wrote about how the game is synchronized with the screen vertical refresh which, and this is no coincidence, also takes place as 60 Hz. So the emulator main loop was already ready and I only had to add one line, a call to soundTick():{
...
realSleep(time_to_next_retrace / 1000);
waitingForVSYNC = false;
mCPU.resume();
soundTick();
}
Besides calling the interrupt handler, soundTick() also informs the sound generator (more on this in one moment) about the note to play for the current time slice. As the notes cannot change between calls to the interrupt handler, this information only needs updates at 60Hz, like everything else.
// Hack for 60Hz int8 sound routine. Call this ~60Hz
public void soundTick()
{
	if ((pit.getChannelFrequency(0)>59.0) && (pit.getChannelFrequency(0)<61.0)) {
		mCPU.callInt(8);
	}

	mSound.setTargetFreq(pit.getChannelFrequency(2));
}
Cpu8088.callInt(int number) method used here did not exist, I had to create it. I followed what the
Intel documentation says, which is in summary: The interrupt handler is fetched from the IVT, the FLAGS are pushed
on the stack and a far call is made to the handler. Later, the IRET instruction (ah! an unimplemented
instruction again! It had been a while...) does the opposite job.Obtaining the speaker frequency (PIT channel 2) is a simple matter of dividing the reference clock (1.193182MHz) by the value in channel 2 (the register accessed through port 42h). This is what the getChannelFrequency() method used above does.
Sound generation
I used theAudioTrack class in streaming mode, where one must continuously supply
samples (PCM 16-bit in this case) by calling the write method.Each call to setTargetFreq(double freq) of the
Sound class stores the
frequency received in argument in a FIFO. A thread reads from this FIFO, generates samples
for a waveform at the requested frequency for a duration of approx. 16ms (~800 samples at 48 kHz)
and passes the buffer to the AudioTrack.write() method.Starving the audio subsystem by not writing enough samples must absolutely be avoided or the "holes" in the sample stream will be heard as annoying clicks and pops. Writing too much here must also be prevented, otherwise the
AudioTrack.write() calls
will eventually block, the FIFO will become full and notes will have to be skipped, ruining
the music.In ideal conditions, with updates at precisely 60 Hz, simply writing exactly 800 samples per note would do the job. But unfortunately this does not work here. The emulator main loop does not run exactly at 60 Hz and does not accelerate to catch up when it ran behind schedule.
My solution is to vary slightly the exact number of samples (typically close to 800) generated according to the FIFO level. When its level is high, I generate and write less samples, so the FIFO level goes down faster. Likewise, when the FIFO level is low, the number of generated and written samples increases, and this buys time to refill the FIFO. The FIFO level oscillates around 50% and the undesirable side effects outlined above are avoided.
About the waveform
While a squarewave is technically the correct waveform, I felt it was a bit too rough, especially in earphones. I tried replacing it by a sinewave:
However, this was way too soft. It was generally difficult to hear, and the lower notes were almost inaudible...
I added the 3rd and 5th hamonics to the mix and this worked pretty well. It also gave the sound an interesting timbre:

However I was still unsatisfied about the bass. So I made it so that below 200 Hz, a modified square wave is added to the mix. (The mixing coefficient increases as the note frequency goes down, so it is a progressive transition.)
Here is what I mean by modified squarewave:

And when mixed with the standard waveform (1st + 3rd and 5th harmonics):

Note fade out
There was one last annoyance. Whenever silence would return (eg: between notes) a small "click" was audible. What was causing it? The sudden return to zero while the waveform was still at high amplitude, as shown below on the left. I added some code to slowly ramp down to zero in this situation and it solved the problem. This is illustrated below on the right.
Waveform generation code
Here is the waveform generator incorporating what was illustrated above.class Sound {
private AudioTrack mTrack;
private int mSampleRate;
private short waveformBuffer[];
private double waveAngle;
private short last_sample = 0;
...
Sound()
{
mSampleRate = AudioTrack.getNativeOutputSampleRate(AudioManager.STREAM_MUSIC);
bufsize = AudioTrack.getMinBufferSize(mSampleRate, AudioFormat.CHANNEL_OUT_MONO,
AudioFormat.ENCODING_PCM_16BIT);
mTrack = new AudioTrack(AudioManager.STREAM_MUSIC, mSampleRate, AudioFormat.CHANNEL_OUT_MONO,
AudioFormat.ENCODING_PCM_16BIT, bufsize, AudioTrack.MODE_STREAM);
waveformBuffer = new short[mSampleRate];
}
...
private void writeSound(int n_samples, double frequency)
{
int i;
if (frequency < 15 || frequency > (mSampleRate / 3)) {
// fade out to avoid clicks and pops
for (i = 0; i < n_samples; i++) {
waveformBuffer[i] = (short)(last_sample - (i * (last_sample / n_samples)));
}
// reset sine angle to 0, to avoid clicks/pops at next note attack
waveAngle = 0;
last_sample = 0;
} else {
double radians_per_second = 2.0 * Math.PI * frequency;
for (i = 0; i < n_samples; i++) {
double sample = Math.sin(waveAngle), coeff = 4.0;
double sample3rd = Math.sin(waveAngle * 3.0), coeff3rd = 2.0;
double sample5th = Math.sin(waveAngle * 5.0), coeff5th = 1.5;
double square;
double square_coeff = 0.5;
int low_boost_thres = 200;
if (sample < -0.5) {
square = -1;
} else if (sample > 0.5) {
square = +1;
} else {
square = 0;
}
// At low frequencies, increase square wave level (adds harmonics) for louder
// reproduction in small phone speakers.
if (frequency < low_boost_thres) {
square_coeff += (low_boost_thres - frequency) * 2.0 / (double)low_boost_thres;
}
double mixed = (coeff * sample +
coeff3rd * sample3rd +
coeff5th * sample5th +
square_coeff * square)
/
(coeff + coeff3rd + coeff5th + square_coeff);
last_sample = (short)((mixed * Short.MAX_VALUE));
waveformBuffer[i] = last_sample;
waveAngle += radians_per_second / mSampleRate;
}
}
mTrack.write(waveformBuffer, 0, n_samples);
}
}The new version of the game, no longer silent, is available in the play store.
To be continued, but try it now!
However, version 4 is available, why not try?
Release history:
- 2018-08-26: First public release (Beta)
- 2018-09-15: Version 2:
- Support two player (recalls last used values for each player)
- Hide the in-game input fields, cursor and box
- Hide the Fire button after firing
- Hide the angle and velocity buttons too after firing the shot in 2-player mode (in 1-player mode, the widget stays there so you can refine the parameters during the computer's move)
- 2018-11-10: Version 3 and 4:
- Lower CPU usage
- Emulator is now paused when the app is suspended
- Support for french language
- 2018-11-17: Version 5: PC Speaker emulation (finally there is sound!)
Google Play and the Google Play logo are trademarks of Google LLC.