Gamecube controller to N64 adapter
Introduction
 A common problem with the N64 controllers is the joystick. It wears
down and become unusable. However Gamecube controllers don't seem
to wear down much and are quite similar to the N64 controllers.
A common problem with the N64 controllers is the joystick. It wears
down and become unusable. However Gamecube controllers don't seem
to wear down much and are quite similar to the N64 controllers.So I've been asked many times if I could design an adapter for using Gamecube controllers on a N64 system. This project is the result.
Features:
- Official wired Gamecube controllers supported (includes the white Japanese controller with extra long cable).
- Nintendo Wavebird and Intec wireless controllers supported.
- Should work with any device equivalent.
- Programmable button mappings to improve gameplay.
- Low latency polling algorithm (approx. 5ms, less than one frame).
- Upgradeable firmware
- LED or Buzzer output for programming feedback.
Partly assembled or complete adapters are available in the store!
Circuit only, assembled and programmed. (Solder your own wires)
Complete adapter (ready to play!)
Pictures
Here are a few pictures. Send me yours and I'll add them here!
N64 and GC controller
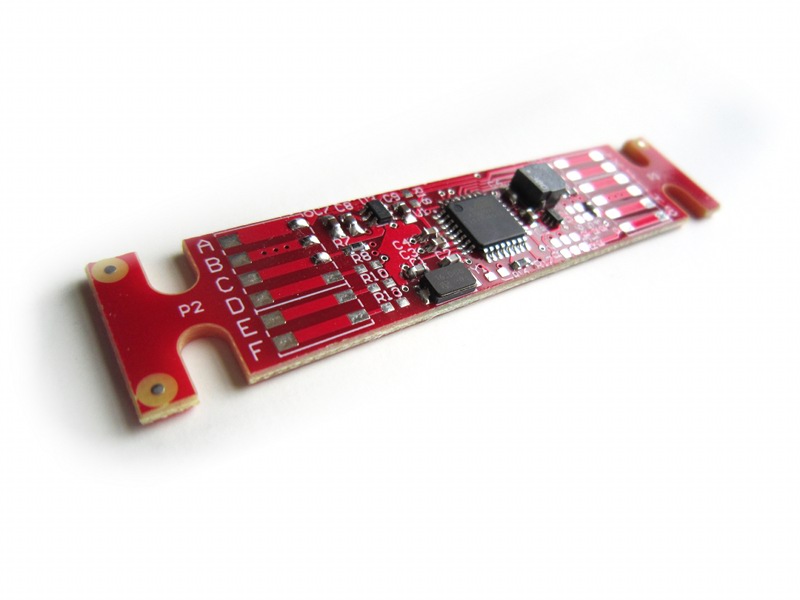
PCB

Version 2

Version 2 (LED on)
Button mapping
In order to improve gameplay, or sometimes simply make it possible, I wrote the firmware to make it possible to define new mappings without too much difficulty (i.e. No changes to the source code). This is done with mapping codes. Due to the high number of possibilities, codes tend to get long quickly. Therefore, four custom mappings can be saved and recalled using the D-pad directions.Use the tool below to map Gamecube buttons, axis or states to different actions on the N64 side. Do your selection(s) and click "Generate" to output the mapping code. Enter it using the instructions given on the right.
Entering a mapping code
1) Place the adapter in mapping management mode.Activating this mode:
- During use: Hold the 'start' button down for approximately 8 seconds. Release after hearing a quick succession of 5 beeps coming from the adapter.
- At startup: Hold the 'start' button when the adapter powers up. (I.e. Press and hold 'start', turn-on the N64 or connect the adapter, release after the 5 beeps.
In mapping management mode, simply press the buttons corresponding to the code. After each group ending by an 'L', the adpater will confirm with a single beep.
At the end, when the 'start' button will have been pressed, the adapter will emit 3 beeps to confirm the new mapping becoming active and will return to game mode.
Saving and recalling favorite mappings
1) Place the adapter in mapping management mode.By holding the start button, as described above.
2A) Saving the current mapping
In mapping management mode, first press R. Then, press one of the D-pad directions. Each "direction" can hold a mapping of your choice. After a few seconds, the adapter will emit 3 beeps to confirm the new mapping is active and will return to game mode.
2B) Loading a mapping
Upon entering mapping management mode, press the D-pad direction associated with the mapping you wish to load. The adapter will the emit 3 consecutive beeps to confirm the new mapping is active and will return to game mode.
2C) Loading the default (built-in) standard 1:1 mapping
Upon entering configuration mode, firs press R, then press START.
3) Toggling the dead-zone feature (since version 1.3)
Starting with version 1.3, the adapter can generate a deadzone. This is required for some gamecube controllers that do not always recenter exactly at 0,0. To do this, enter mapping management mode and press R followed by Z. Wait a few moments for the final beeps. The setting is a global setting stored in the adapter.
4) Set a stored mapping to be active by default (since version 1.5)
In mapping management mode, first press R. Then press L. Then press the D-pad direction corresponding to the mapping you want to be active at power up. To restore the default behaviour (i.e. Standard 1:1 mapping), press START instead of a D-pad direction.
5) Cycling through joystick value conversion modes (since version 2.0)
It is possible to cycle through different types of conversions, in this order:
- V2.0 style (default)
- Extended mode (V2.1 only, very sensitive)
- Old v1.5 style (less sensistive diagonals).
6) Reset adapter to factory defaults (since version 2.0)
To erase all stored mappings and restore all settings to their defaut (eg: Dead-zone), enter configuration mode, then press R, followed by X. Wait a few moments and the adapter will confirm the change by blinking twice and returning to game mode.
7) Toggle the built-in controller pak (memory card) (since version 2.3)
To disable (if currently enabled) or enable (if currently disabled) the built-in controller pak, enter configuration mode, then press R, followed by Y. Wait a few moments and the adapter will confirm the change by blinking twice and returning to game mode.
Errors
At any moment, it an error occurs (Attempt to load a mapping from a free D-pad direction, error while entering the code, etc), the adapter will produce 4 beeps (one long, 3 short) and will return to game mode.KNOWN ISSUES:
- Prior to version 1.3.1, when mapping the main joystick to buttons, the up[18]/down[19] and left[20]/right[21] directions are inverted.
- Prior to version 1.3.1, there is a bug when entering a new mapping code where the unchanged parts of the previously active mapping remained in effect. The workaround is to disconnect/reconnect the adapter before entering a new mapping. (Note that saving and loading mappings always worked fine)
- Prior to version 1.2.2, the L/R analog sliders would control the N64 L and R buttons even when set to "[20] None" above. (But they worked as expected when assigned differently). To disable the L/R sliders, use the BBXZBBAL ZBBAL START code. To combine with your custom mapping, simply insert BBXZBBAL ZBBAL before START.
Menu flowchart
The following flowchart provides a good overview of the configuration/mapping management mode described in the above section.
v2.2 menu flowchart
Mapping collection
Here is a table which I hope will become big. Don't hesitate to contact me to share the mappings which you think are useful. If possible, please include details about the games your need the mapping for and comments about your mapping decision.| Mapping | Game(s) | Comments |
|---|---|---|
| R START | Generic | Basic mapping. Buttons of the same name are equivalent. |
| XZBBL BAAZXL ZXL START | Mario Kart 64 | Z for drifting, items X or Y. I think using Z for drifting feels better than the 'R' slider (Z needs less finger motion to activate). |
| BAAZBXL ZXAL START | Starwars - Shadow of the empire | Y and X buttons mapped to C-Up and C-Left. Use to throw the harpoon (easier than reaching for the C-stick) |
| [...] BBXZBBAL ZBBAL START | * | For version 1.2.1 (and older). Unmap the L and R analog sliders for real. (They were still mapped to N64 digital L and R when set to "[20] None" above. If you have a custom mapping, simply insert the BBXZBBAL and ZBBAL words before your final START button press. |
| XZBBL BBZXL ZBAAL ZBABL ZBAXL ZBAYL YXZBBAL ZBBAL BAXZBXL ZBYL ZXAL ZXBL BXAZYXL ZYYL START | Goldeneye 007 N64 | In the game set control style to 1.2 Solitaire. Now you are able to play Goldeneye with a Halo/Call of Duty controller style. |
| BAZXAL ZXBL BYZBBAL ZBBAL ZBBAL BAAZBYL ZXL BBXZXAL ZXBL start | Earthworm Jim 3D | Camera control with L/R, weapons on X/Y |
| XZBBL BAZXL ZXL XXZBAL BAAZBXL ZXAL START | Super Smash Bros. 64 | This code maps X and Y to jump, Z to grab, R and L to shield, and up on the Dpad to taunt (matches melee/brawl/smash4 gc controller mappings) |
| XZBBL BAZBBL BXZAL ZAL ZAL ZAL ZBAL ZBAL ZBAL ZBAL BAAZBYL BAAZBYL ZBYL BBXZXLZXL START | Super Smash Bros 64 | I tried to replicate future Super Smash Bros control mapping while improving upon them and adding features similar to them.
|
| XZBBL BAZXL ZXL ZAL ZAL ZAL ZAL ZBAL BAAZXBL ZBXL ZBAAL ZBABL ZBAXL ZBAYL ZXL ZXL ZYXL ZYYL START | Super Smash Bros | Behaves exactly like Melee and Brawl.
|
| BZAL ZBXL BAZXL BXZBL ZBL ZBL XXZBAAL ZBABL ZBAXL ZBAYL BAAZBYL ZXALZBAAL ZBABL ZBAXL ZBAYLZXL ZBBL START | Lylat Wars | I built this configuration so the controls aren't difficult to use or are hard to remember.
|
| XZBBL BAZXL ZXL XXZBAAL ZBABL ZBAXL ZBAYL BAAZAL ZXL BBXZXL ZXL START | Super Mario 64 | I designed this for all situations in Super Mario 64.Mario can croutch with a short press of either trigger.Z is close up or far away camera.
C stick is used to adjust camera angle.A & X are jumping.B is hitting and Y is also crouching and is good for long jumping.The d pad can be used
like the stick and can be used for even more sneaky slow walking.
(Submitted by Benjamin Wilkinson) |
| BZBYL ZXBL BAZXL BXZB BAL ZBBAL ZBBAL ZBBAL ZBAAL ZBABL ZBAXL ZBAYL BAAZBXL ZBL ZBAAL ZBABL ZBAXL ZBAYL ZXL ZBBL START | F Zero X | You'll have to put in the adapter first then input the code.Press the reset button on the N64 so it recognises the controller when it restarts. I gave it controls very similar to F Zero GX.
|
| XZBXL BAZXL BXZBAL ZXBLZXBL ZBAL ZBAAL ZBABL ZBAXL ZBAYL BAAZXL ZXL ZBAAL ZBABL ZBAXL ZBAYL ZXL ZBBL START | Mario Kart 64 |
|
| XXZBAAL ZBABL ZBAXL ZBAYL BXZXBL ZXBL ZXBL XZBXL BAZBBL BAAZXL ZXLZBAAL ZBABL ZBAXL ZBAYL ZBBL ZBBL START | Diddy Kong Racing | This game needs both triggers to be drift for any vehicle.
|
| XZXAL BAZXL BYZBXL ZXL ZXL ZBXL ZBYL ZXAL ZXBL BAAZBYL ZXBL ZBAAL ZBABL ZBAXL ZBAYL ZBBL ZXL START | Ocarina of Time | I had an idea to combine the shield and target functions into the shoulder buttons since they both hold two buttons each and can be useful in many situations in Ocarina of Time. I gave many options to choose what way you want to bring up an item.
|
Using memory cards
I am asked once in a while how one can use a memory card with this adapter to save your game. Well you can just install the memory card in a spare controller which you connect to another port.While this works well for many games, for instance with Turok 2 : Seeds of evil, there are complications with others, such as Mario Kart 64 which wants the memory card in port 1. The adapter must then be connected to port 2, but the game does not let you play alone with controller 2 (the adapter). However Mario Kart 64 only uses the memory card only for ghost data in time trial, and I think this is a loss one can probably live with.
Anyway, for a lot of good games with memory built into the cartridge, this is of course a non-issue.
Hardware
First of all, here is the schematic:
Selecting the MCU
I decided I would use an Atmel MCU, if possible the Atmega8 (or the new Atmega8a). Why?
- First of all, I have a lot of experience with the AVR architecture.
- Next, I'm able to use code from my other projects such as the N64 and Gamecube to USB adapters. Especially the assembler communication code. Using a different MCU architecture would mean a rewrite.
- Finally, since I use a lot of Atmega8 in my project, I save by buying greater quantities.
I think using power from the N64 controller port is the most convenient solution. Unfortunately, only 3.3 volt is available on the N64 ports and the Gamecube controllers expect 5 volt AND 3.3 volt. Also, using an Atmega8 at 16mhz requires 4 volt.
It was therefore necessary to obtain 5 volt from the N64 3.3 volt source. I decided to do it with a charge pump, the LTC3200ES6-5 from Linear Technology because of its small size, low external component count, and regulated output. (It does not simply 'double' the voltage unlike some others).
The LTC3200ES6-5 is probably difficult to use if not mounted on a PCB. An alternative that would probably be suitable is the VBSD1-S3.3-S5-SIP module from Cui. The datasheet recommends a 4.7uF low ESR capacitor at the input and a miminum 20mA load is specified. I would recommend installing a 220ohm resistor load to make sure. Read the datasheet for details.
You are also free to use an external 5 volt power source instead. For instance, this could be a regulated 5v wall-wart or USB port.
About the "rumble" fonction
At the moment, it is not supported. My reasoning for not supporting it is the following: When Nintendo decided to start selling the 'rumble pack', it did not use the 3.3 volt from the Console. It used it's own batteries. The leads me to think that the current a N64 can supply is limited and probably too low for reliable operation if driving motors.
Of course, the power requirements of a N64 'rumble pack' may be different from the requirements of a Gamecube controller motor. I will look closely into this later by taking measurements and looking at the N64 internal circuitry (Fuses? etc).
So for the moment, I did not bother to write the code needed to forward the motor control requests because my adapter uses the N64 ports 3.3 volt supply. But if you use an external power source or a wiresless controller supporting rumble, I don't see a problem implementing the rumble funcion.
I recall reading a few times that the 5 volt supplied to a Gamecube controller is only for the motor. But there are controllers that need it to work normally (yes, not only rumble). That's why even though the rumble function is never activated, I am still supply 5 volt to the Gamecube controller.
Firmware update
Option 1: Special N64 ROM
V2 adapters (Atmega168 + LED) can be updated using a special ROM on a N64 console, but this requires a reprogrammable N64 cartridge. Otherwise, as always, the normal AVR programming tools must be used.ROM: gc2n64_manager-1.1.v64 (Contains version 2.1 and 2.0)
ROM: gc2n64_manager-1.0.v64 (Contains version 2.0 only)


Option 2: 3rd generation N64 to USB adapter
Firmware updates can also be performed through a raphnet 3rd generation Gamecube/N64 controller to USB adapter. Use the Manage GC to N64 adapter option from the Tools menu in the Adapter management tool.
Tools -> Manage Gc to N64 adapter
Firmware (for V2, Atmega168 + LED)
Note: Files here are for new (v2) adapters built using a Atmega168 and a LED indicator.The software for this project is distributed as source code and ready to flash .hex files.
Important!
The fuse bytes must be configured appropriately for the MCU to run at the correct speed. For this project, the values are: high_byte=0xdc, low_byte=0xd7, extended_byte=0x01.
Setting the lock bits to protect the bootloader against modifications is also a good idea: lock: 0x2F
For details about how to program an AVR, visit my AVR programming page.
Now, here are the files:
| Version v2.1 April 9, 2017 (Sunday) |
|---|
|
| File(s): gc_to_n64-2.1.tar.gz (196.8 KB) gc_to_n64-2.1.hex (21.5 KB) |
Show previous releases...
| Version v2.0 October 14, 2015 (Wednesday) |
|---|
First release for adapter version 2:
|
| File(s): gc_to_n64-2.0.tar.gz (71.5 KB) gc_to_n64-2.0.hex (21 KB) |
Firmware (for V1, Atmega8 + Buzzer)
Note: Files here are for old adapters (v1) built using an Atmega8 and a speaker/buzzer.The software for this project is distributed as source code and ready to flash .hex files.
Important!
The fuse bytes must be configured appropriately for the MCU to run at the correct speed. For this project, the values are: high_byte=0xc9 low_byte=0x1f
For details about how to program an AVR, visit my AVR programming page.
Now, here are the files:
| Version v1.5.1 March 15, 2015 (Sunday) |
|---|
| New fuse values to enable brown out detector. Fixes the issue of random loss of mappings at startup. |
| File(s): gc_to_n64-1.5.1.tar.gz (34.8 KB) gc_to_n64-1.5.1.hex (17 KB) |
Show previous releases...
| Version v1.5 February 7, 2015 (Saturday) |
|---|
|
| File(s): gc_to_n64-1.5.tar.gz (34.5 KB) gc_to_n64-1.5.hex (16.8 KB) |
| Version v1.4 May 19, 2013 (Sunday) |
|---|
Bug fixes and improvements:
|
| File(s): gc_to_n64-1.4.tar.gz (34.7 KB) gc_to_n64-1.4.hex (17.9 KB) |
| Version v1.3.1 April 28, 2013 (Sunday) |
|---|
Bug fixes:
|
| File(s): gc_to_n64-1.3.1.tar.gz (33.8 KB) gc_to_n64-1.3.1.hex (17.8 KB) |
| Version v1.3 March 20, 2013 (Wednesday) |
|---|
New feature:
|
| File(s): gc_to_n64-1.3.tar.gz (33.6 KB) gc_to_n64-1.3.hex (17.7 KB) |
| Version v1.2.2 February 12, 2013 (Tuesday) |
|---|
Bug fixes and maintenance:
|
| File(s): gc_to_n64-1.2.2.tar.gz (33.2 KB) gc_to_n64-1.2.2.hex (17.4 KB) |
| Version v1.2.1 July 31, 2012 (Tuesday) |
|---|
Bug fixes and maintenance:
|
| File(s): gc_to_n64-1.2.1.tar.gz (32.5 KB) gc_to_n64-1.2.1.hex (17.4 KB) |
| Version v1.1 February 2012 |
|---|
Compatibility fixes:
|
| File(s): gc_to_n64-1.1.tar.gz (30 KB) gc_to_n64-1.1.hex (17.7 KB) |
| Version v1.0 August 2011 |
|---|
First release:
|
| File(s): gc_to_n64-1.0.tar.gz (31.4 KB) gc_to_n64-1.0.hex (15.9 KB) |
PCB
The circuit can be (re)programmed by soldering wires or installing an adequate connector on the back side.
Stick translation
A few facts about standard N64 controllers:
- The N64 stick generates two numerical axis values: One for the X axis and one for the Y axis.
- The values are transmitted to the console using 8 bits and are signed. This imposes a -128 to +127 theoretical limit on transmitted values.
- In practise, the typical range observed is more or less from -80 to +80.
- On worn down controllers, this range gets a bit narrower.
- The stick physically moves inside an octogonal recess with stretched corners. Unlike gamecube controllers, this is not a regular octogon.
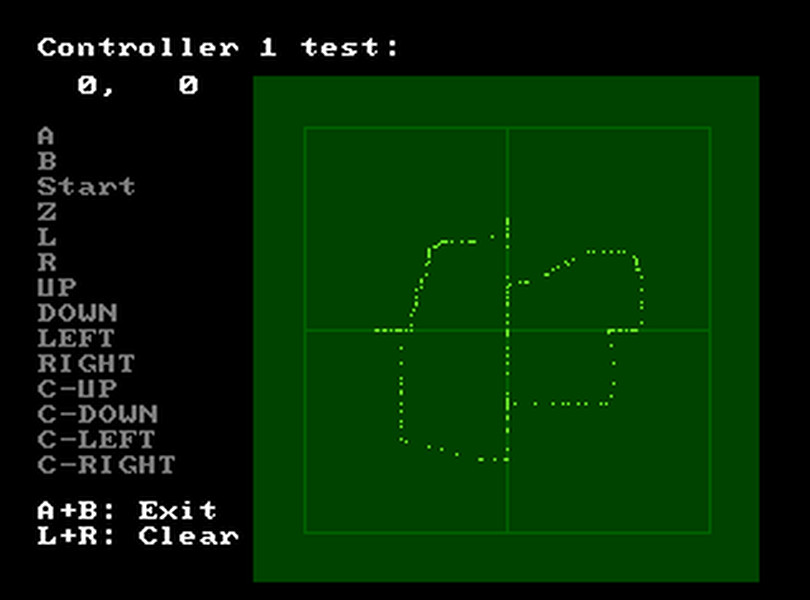
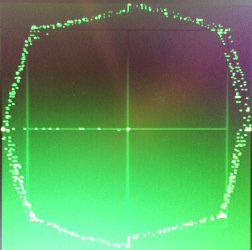
Standard controller curves
Here are graphical representations of the maximum values from two N64 controllers in excellent condition. The grid in the background covers -80 to +80 values.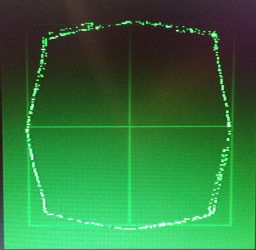
Official controller 1
Official controller 2
Observations:
- The two controllers slightly exceed the ±80 range vertically.
- The diagonal maximum values are lower than for horizontal and vertical deflections. This is as expected for a stick constrained to move within an octogon.
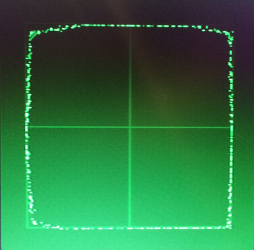
Hori mini N64 curve
Hori mini N64 curve (Gamecube style stick)
A few facts about the Hori mini:- The stick generates values ranging from -100 to +100
- The stick moves inside an irregular octogon, yet it seems a bit more regular than for the standard controller.
- The Hori controller covers a larger range than the standard N64 controller.
- The designer clearly adjusted the scale to get ±80 in the diagonals.
- The diagonal values are higher than with regular controllers.
- Vertically and horizontally, the values largely exceed the ±80 range observed on standard controllers.
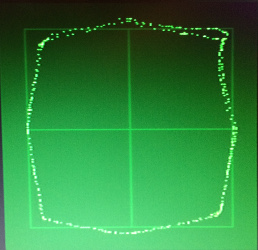
The Gamecube to N64 adapter
The adapter receives values from the Gamecube controller and applies a transformation for the N64 console. Here are the default resulting profile for different adapter versions:
Version 1.5
Version 2.0
Many users reported that the in-game character would not reach his top running speed in diagonal. This is why I stretched the profile corners in version 2.0. But the version 1.5 profile is still available using the built-in menu (Read the instructions in the mapping section).
Here is the resulting profile if the adapter does not apply a transformation on the Gamecube stick values and just forwards them to the N64. This mode is available since firmware 2.1 and is know as extended mode.
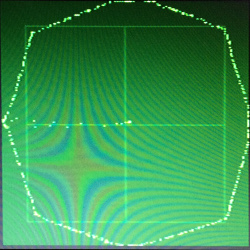
Gamecube (Adapter v2.1 Extended mode)
Disclaimer
I cannot be held responsible for any damages that could occur to you or your equipment while following the procedures present on this page. Also, I GIVE ABSOLUTELY NO WARRANTY on the correctness and usability of the informations on this page. Please note, however, that the procedures above have worked in my case without any damages or problems.Now you cannot say that I did not warn you :)