How to program an AVR
Introduction
This page explains how to program an AVR microcontroller with the 6 Pins ISP interface. (ISP means In System Programming).ISP 6 Pins pinout: avr_isp-pinouts.html
Concepts
- hexfile: An hex file or hexfile (Named like this because they contain hexadecimal numbers and the filename typically ends by .hex) generally contains the program which will be executed by the microcontroler. This is what will be stored in the microcontroler's flash memory.
- Fuse bits or bytes: The fuses bytes are used to configure some parameters in the microcontroler. For example, fuse bytes are used to enable the use of an external crystal. Typically, the fuse bytes are given as one or two hexadecimal values.
Tools
An adapter cable between a computer and the ISP connector is needed. Here are a few options:-
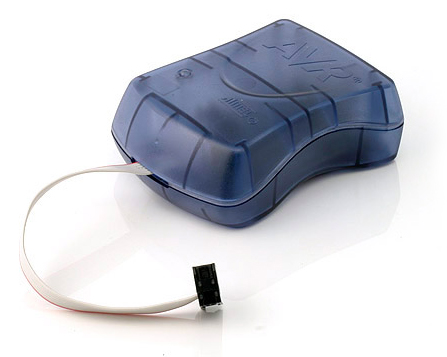
Atmel AVR ISP
(see picture on the right). That's what I most often use. Atmel provides a Windows program named Avr Studio. Under Linux, the adapter is supported by many programs such as uisp and avrdude -
Atmel AVRISP mkII.
This is a newer version of AVR ISP which uses USB instead of a serial port. Of course, Atmel's software, Avr Studio, supports it. Under Linux, I use this adapter with avrdude. - PonyProg.
This tool can reprogram many AVR microcontrôleurs from a parallel port (Schematics included)

Atmel AVR ISP
Atmel ISP mkII
Examples
Examples using UISP:First of all, please note that in the following examples, /dev/avr is a symbolic link to the serial port device where the programmer is connected. (eg: /dev/ttyS0). Also, dont forget to change the -dpart argument if you are not using an AVR Atmega8.
Programming the fuses bytes on an atmega8:
# uisp -dprog=stk500 -dpart=atmega8 -dserial=/dev/avr --wr_fuse_h=0xc9 --wr_fuses_l=0x9f
Programming an hex file into an atmega8:
# uisp -dprog=stk500 -dpart=atmega8 -dserial=/dev/avr --erase --upload --verify if=n64_to_wii.hexNote: --erase is for erasing the flash memory BEFORE programming the new file. --verify provides a way to read back the flash content and compare it with the original file to making sure no errors occured.
Examples using AVRDUDE and an USB ISP mkII:
Programming the fuses bytes on an Atmega8:
# avrdude -p m8 -P usb -c avrispmkII -Uhfuse:w:0xc9:m -Ulfuse:w:0x9f:mNote: The -p option is used to specify which type of AVR you are programming. To display a list of supported device, try 'avrdude -p list -P usb -c avrispmkII' (since 'list' is not a valid type, avrdude lists supported types).
Programming an hex file into an atmega8:
# avrdude -p m8 -P usb -c avrispmkII -Uflash:w:n64_to_wii.hex -B 1.0Note: The -B argument controls the ISP bit clock period (in microseconds). This frequency must not be higher than 1/4 of the MCU clock.
Tips and tricks
Here are a few details often unknown to beginners:- Power supply: Normally, the programming dongle does not supply power to the micro-controller being programmed. For programming to succeed, power must be supplied to the circuit first.
- Clock: The micro-controller cannot be programmed without an active clock. When an AVR chip is new, due to the default fuses value, an internal RC oscillator is running. If you then set the fuse bits for an external crystal oscillator, the said crystal must be present for subsequent programming steps to succeed.