Gamecube/N64 to USB adapters manual (for old adapters only)
Adapter types
This page is about the old adapter version (i.e. before V3). While some
content still applies to some extent (how to configure emulators, for instance)
most of the tips and workarounds on this page are no longer necessary and can
even be harmful.
For instance:
This page explains how to use the following adapters that are based
on the old Gamecube/N64 to USB project.
Adapters based on this project were available in my
online shop.
For instance:
- Under normal circumstances, no calibration is necessary. Performing calibration, especially with Gamecube controllers, will cause issues with the L/R sliders. Just don't do it.
- The Calibration fixer tool does not support V3 adapters, because as mentionned above, it is not necessary to calibrate.
| GCN64-USB | N64-USB | GC-USB |
|---|---|---|
| N64 or Gamecube to USB | N64 only to USB | Gamecube only to USB |
 |
 |
 |
| (shop) | (shop) | (shop) |
Quick guide
- Connect the adapter to a free USB port.
- Connect a Gamecube or N64 controller.
- Perform calibration using the control panel tool (See calibration below).
- If you are using a Gamecube controller, run the calibration fixer tool. (See the Gamecube sliders Fix below)
- In your game or emulator, assign buttons and axes.
- Calibration is usually required in order for the axis to be able to reach their maximum effect in the game. (i.e. Character fully running).
- The Gamecube L and R sliders can be tricky. Use the calibration fixer and refer to the section specific to your emulator for additional tips.
- N64 and Gamecube controllers cannot be connected simultaneously to the same adapter.
Calibration
This page is only for V2 adapters. If you have a V3 adapter, no calibration is necessary.
Performing calibration, especially with Gamecube controllers, will cause issues with
the L/R sliders. Just don't do it.
Calibration is performed from the Windows game controllers dialog.
Game controller settings

Test screen
Right-click and select Game controller settings, select the adapter named "GC/N64_USB" and click the Properties button. This will open a window with a Test tab and Settings tab. Click on the Settings and click Calibrate to open the game device calibration wizard.
For a Gamecube controller, follow the calibration procedure:
- Welcome to the wizard. Thanks. Click Next.
- Find Center Point: As it says, don't touch the D-Pad or any analogic stick or sliders. Just press a button such as A.
- Axis calibration: The dialog says D-Pad, but it really is the main analog stick we are calibrating. Move it around in all directions until releasing it brings the cross in the center. Press a button such as A to continue.
- Verify Center Point: The computer needs to know what the center point is. With the main analog stick released so that it auto-centers, just press A to continue.
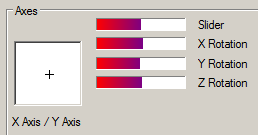
- Axis calibration (Slider): This is in fact the R slider. Slowly push it down until the slider reaches the digital button. Increase pressure until it clicks. This button press registers and brings us to the next calibration step.
- Axis calibration (X Rotation): This is in fact the C-Stick Left-Right axis. Move the axis fully left and then fully right. Press A to continue.
- Axis calibration (Y Rotation): This is in fact the C-Stick Up-Down axis. Move the axis fully up and then fully down. Press A to continue.
- Axis calibration: This is in fact the L slider. Slowly push it down until the slider reaches the digital button. Increase pressure until it clicks. This button press registers and brings us to the next calibration step.
- Calibration Complete: Click Finish and run the calibration fixer (see below).
For a N64 controller, follow the calibration procedure:
- Welcome to the wizard. Thanks. Click Next.
- Find Center Point: Just press a button such as A. Don't touch anything else.
- Axis calibration: It says D-Pad, but it really is the analog stick we are talking about. Move it around in all directions until releasing it brings the cross in the center. Press a button such as A to continue.
- Verify Center Point: The computer needs to know what the center point is. With the analog stick released so that it auto-centers, just press A to continue.
- Axis calibration (Slider): This only applies to Gamecube controllers. Press A to continue.
- Axis calibration (X Rotation): This only applies to Gamecube controllers. Press A to continue.
- Axis calibration (Y Rotation): This only applies to Gamecube controllers. Press A to continue.
- Axis calibration: This only applies to Gamecube controllers. Press A to continue.
- Calibration Complete: Click Finish. Do not run the calibration fixer.
Important: The names displayed by the calibration wizard, such as D-Pad and X/Y/Z Rotation, are misleading and wrong. Please ignore them and follow the steps above carefully.
Gamecube sliders Fix
This tool is only or old (pre-V3) GC/N64 to USB adapters. It does not support V3 adapters,
and no calibration is normally necessary with V3 adapters.

Uncorrected L/R sliders
Corrected L/R sliders
The following tool must be run after calibration (see instructions above). When it is run, it looks for raphnet GC/N64 to usb adapters and alters the calibration data the system keeps for each unit found. All axis are left as calibrated, except the L and R sliders which are recentered.
The tool can be downloaded right here:
gc_calfix_ng_v1.3.zipSupports all adapter versions.
A successfull operation will output something like this:

Old versions:
gc_calfix_ng_v1.2.zipSupports all adapters up to version 2.3.
gc_calfix_ng.exe Supports adapters up to version 2.2
gcjoycalfix_v2.exe For firmware v2.1.
gcjoycalfix.exe For older adapters.
FAQs, tips and tricks
- The Gamecube L and R sliders may hinder or prevent button assignments in some games due to their non-central rest position (they look active). To prevent this, always run the calibration fixer tool once following a normal calibration procedure. See Gamecube sliders Fix above for details.
- The L and R sliders can be disabled if L and R are fully pressed when connecting the Gamecube controller to the adapter. Useful for performing button assignment in games where the L and R analogic values are getting in the way.
- If you want to assign the digital L and R gamecube buttons but the game software always detects and assigns the analog axis instead, disable the analog function using the technique described in the point above. This can be done temporary and only for this specific assignment. If you are lucky, some software (such as Dolphin) may offer the possiblity selecting the button from a list which is much easier!
- If calibration is not performed, the analog axis (Main stick, C-Stick, sliders) may not be 100% effective in the game. (i.e. Character walking instead of running). Refer to this page's calibration section for instructions.
- Vibration requires firmware 2.0 and above, and is only tested with project64 and Dolphin under Windows 7.
Project64 with N64 controller
PJ64 N64 config
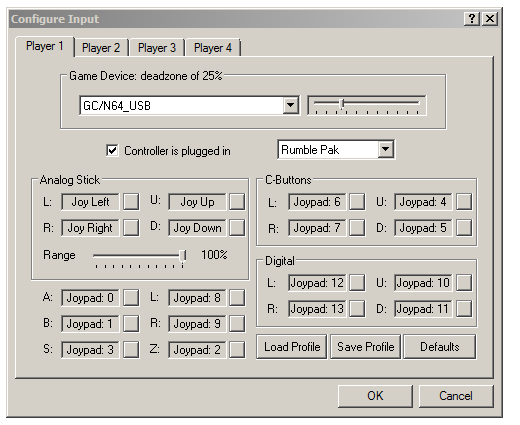
In the Configure Input dialog that opens, select the game device and assign buttons according to your preference. For reference, here is a saved profile for a N64 controller with standard button mapping:
raphnet_pj64_n64controller.jsf
Note: Some users experience an issue where the rumble starts the moment the game loads and won't stop. In those cases, it appears that using the N-Rage input plugin instead of Jabo's DirectInput plugin solves the problem.
Project64 with Gamecube controller
This is possible, but the L and R sliders add complexity. First of all, make sure to perform calibration according to the above instructions. Then in project64 Options menu, select Configure Controller Plugin....In the Configure Input dialog that opens, select the game device and assign buttons according to your preference. However there will be complications involving the L and R sliders because of the combined analog and digital functions. There are two ways to get around this.
Option 1:Accept to use the L/R sliders analogic feature to control the N64 L/R buttons. Nothing special is required in this case. The sliders will appear as "Rz-" and "S0-" in the dialog box.

Gamecube digital L/R
There is no need to hold down L and R each time you connect the controller. It is only required if you wish to reconfigure the input. In any case, I recommend saving the configuration profile. Here's a copy of my config you may use to save time:
raphnet_pj64_gc_digital.jsf
Dolphin with Gamecube controller
The first part is simple:1: Make sure to perform calibration according to the above instructions.
2: In dolphin Options menu, select Gamcube Pad Settings.
3: Assign Buttons, Main Stick, C-Stick and D-Pad. No complications here.
Now it gets slightly trickier...
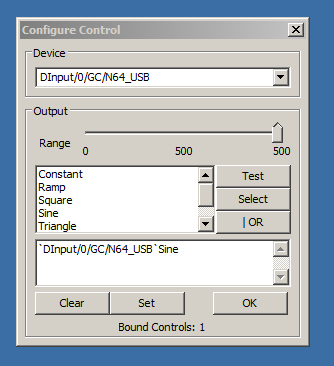
4: L/R Analog. Click the L-Analog and R-Analog assignation buttons and press the corresponding slider.
If you omit to run the L/R slider fix program (see Gamecube sliders Fix above), you may get away with Axis 3- and Axis 2- being assigned the L-Analog and R-Analog respectively. Keep in mind however that the L and R sliders won't do anything until they are 50% pressed down. This won't feel right.
5: L/R Digital. When we try to assign these, the analog part of the L/R sliders always triggers first. But There is an easy workaround: Right-clicking on the assignment button opens a window where one can choose the button from a list. Select Buttons 5 and 6 for the L and R slider buttons respectively. (See screenshot to the right)
6: Vibration. Assign the rumble Motor to the Direct Input device for the controller. (SDL does not seem to work). When you click 'Test', the controller vibrates for a short moment.

Manual assignment

Configured
Motor
Don't forget to Save your configuration profile once you're done!
Mednafen
As of September 2012, the Mednafen multi system emulator has difficulty dealing with the L and R sliders. The button assignment procedure (ALT+SHIFT+1/2) just skips forward because the joystick axis corresponding to the sliders are considered active.Current solutions for the L/R sliders problem are:
- Disabling the L and R analogic function. This is done by holding down the L and R buttons when connecting the gamecube controller. This is only necessary when performing button assignment. (Note that an adapter with a v2 or above firmware is required)
- If compiling Mednafen is an option, you can use my patch that applies to version 0.9.24-wip: mendafen_noncentered_axis.diff. Compiling Mednafen may be more complicated, but with this patch, the L and R analogic axis can still be used.
$ ./mednafen -analogthreshold 30 ...
Win 8.1 issues
The adapter works with Windows 8.1, but users of adapters version 2.3 and earlier may experience some issues. The symptom is that the adapter keeps disconnecting and reconnecting in a loop (the corresponding plug/unplug sounds are also heard every second or so). Adapter version 2.9 should work without problems, but this needs to be confirmed.Workaround 1: When this is happening and an emulator (or other joystick-using software) is started, the controller stays connected and can be used normally.
Workaround 2: For a more permanent solution, the registry can be edited to disable the windows feature that makes this problem appear. The procedure is described in the following Microsoft support page: Some USB devices do not recharge in Windows 8.1
To save you a few steps, here are the USB VID/PID used by different adapter versions:
| VID | PID | Version |
|---|---|---|
| 289B | 000C | v2.9 |
| 289B | 0004 | v2.3 |
| 289B | 0001 | v2.2 |
| 1781 | 0A9A | v1.x |
Workaround 3: I plan to write a tool that will automatically patch the registry as described in step 2.
Wavebird issues
If you are having difficulty getting the Wavebird controller to work, please note the following:- Connecting the Wavebird receiver before connecting the USB cable to the computer seems to work better (for me, always)
- If the wavebird has been connected after the USB cable and does not work, try switching the channel on the receiver (no need to touch the controller) to the next channel for approx. 1 second, then switch it back to the operating channel. In many cases the Wavebird will then begin working.
Gamecube disconnection issues
Some users have reported intermittent Gamecube to USB adapter issues. A very common cause is an incompletely inserted gamecube controller connector.Some adapters have a stiffer than usual Gamecube connector. This means that to get a reliable connection, you may need to push a bit harder than you would normally expect to get it to *snap* into place.
Windows 10
The adapter works fine for me on Windows 10. Here are a few screenshots using Project 64 version 1.6. To access the Game Controllers dialog in Windows 10, seach for "Game controllers" and "Set up USB game controllers" should come up in the results.
Installing (on first connection)

Access to game controlers

Game controllers

Rumble in PJ64

Test screen
One user has reported that the Rumble option in the project 64 drop down is not offered on his computer. But I have not yet been able to reproduce this. If anyone has an idea why this would happen only on some Windows 10 systems, please let me know!