Famicom network controller HVC-051
The controller
A while ago I documented how the NTT Data Keypad (NDK10) for Super Famicom communicates. I did not know it at the time, but a similar controller also existed for the Famicom: The HVC-051!
The HVC-051 controller

The HVC-051 controller
Of course I decided to get one to figure out how it works.... my results are published here.
How it works
To learn about how NES/SNES controller works, I recommend this page: Super Nintendo Entertainment System: pinouts & protocol. Yes, it's for SNES controllers, but it's almost the same. NES/Famicom controllers only need 8 clock cycles to be read since there are fewer buttons.But to read the status of the HVC-051, a total of 24 clock cycles are required. Here are waveforms comparing the HVC-051 bit sequence with that of a normal controller.
Standard Famicom/NES controller:

HVC-051 controller:

And the same data in a table:
| Bit | HVC-051 Button | Standard controller button |
|---|---|---|
| 0 | A / 目次 | A |
| 1 | B / 実行 | B |
| 2 | 前ページ (Previous page) | Select |
| 3 | 次ページ (Next page) | Start |
| 4 | Up | Up |
| 5 | Down | Down |
| 6 | Left | Left |
| 7 | Right | Right |
| 8 | 0 | |
| 9 | 1 | |
| 10 | 2 | |
| 11 | 3 | |
| 12 | 4 | |
| 13 | 5 | |
| 14 | 6 | |
| 15 | 7 | |
| 16 | 8 | |
| 17 | 9 | |
| 18 | * | |
| 19 | # | |
| 20 | . | |
| 21 | C | |
| 22 | ||
| 23 | 通信終了 (End of communication) |
Methodology
I thought it could be interesting to also talk about what I did to find out the bit sequence.Knowing that Famicom/NES controllers are very similar to SNES controllers (they are just shift registers, with a clock, latch and data signal), I built a simple adapter (wire-to-wire, no micro-controller) to connect a Famicom controller to an SNES console.
| Famicom pin | Signal | SNES controller reference |
|---|---|---|
| 1 | GND |  |
| 13 | Data | |
| 12 | Latch | |
| 14 | Clock | |
| 15 | +5v |
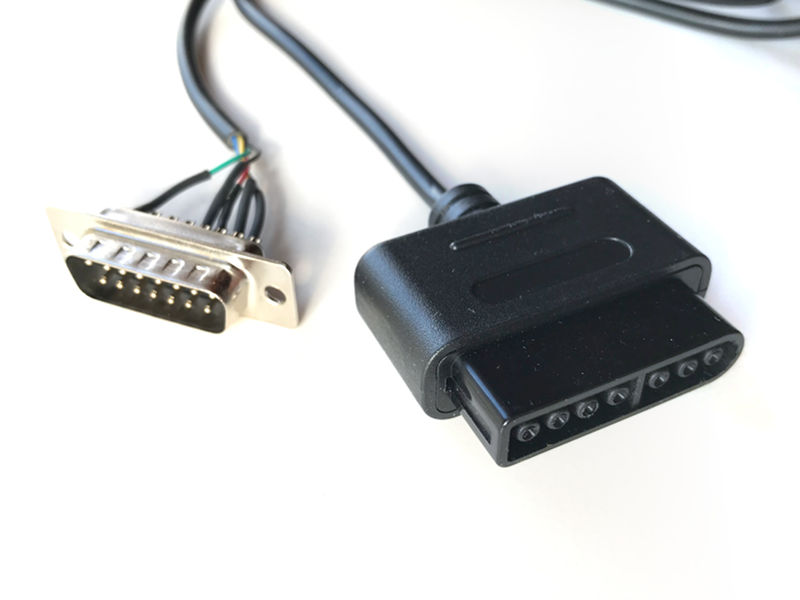
Famicom to SNES
Such an adapter would normally be useless since games expect SNES controllers. But I intended to use my own SNES program, the simple controller test I developed during the 2018/09 RetroChallenge. This tester simply reads 32 bits from the controller and displays the result on screen (a green square means a 0 was present on the wire).
With the HVC-051 and the adapter connected to port 2, I just had to press every button, writing down the corresponding bit.


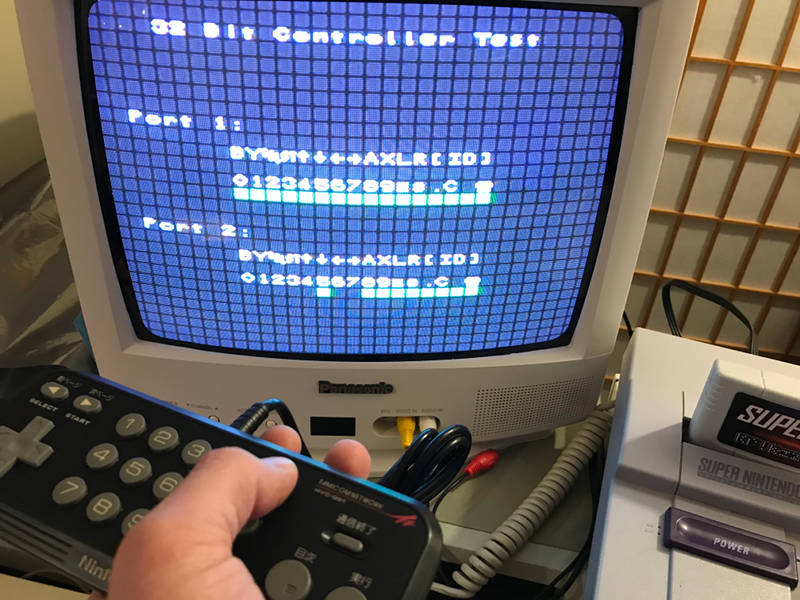
Here is the ROM I used, in case it might be useful: test32.sfc
Disclaimer
I cannot be held responsible for any damages that could occur to you or your equipment while following the procedures present on this page. Also, I GIVE ABSOLUTELY NO WARRANTY on the correctness and usability of the informations on this page. Please note, however, that the procedures above have worked in my case without any damages or problems.Now you cannot say that I did not warn you :)